Auto Patch
The Auto Patch window is accessed by pressing & in the lower left hand corner.
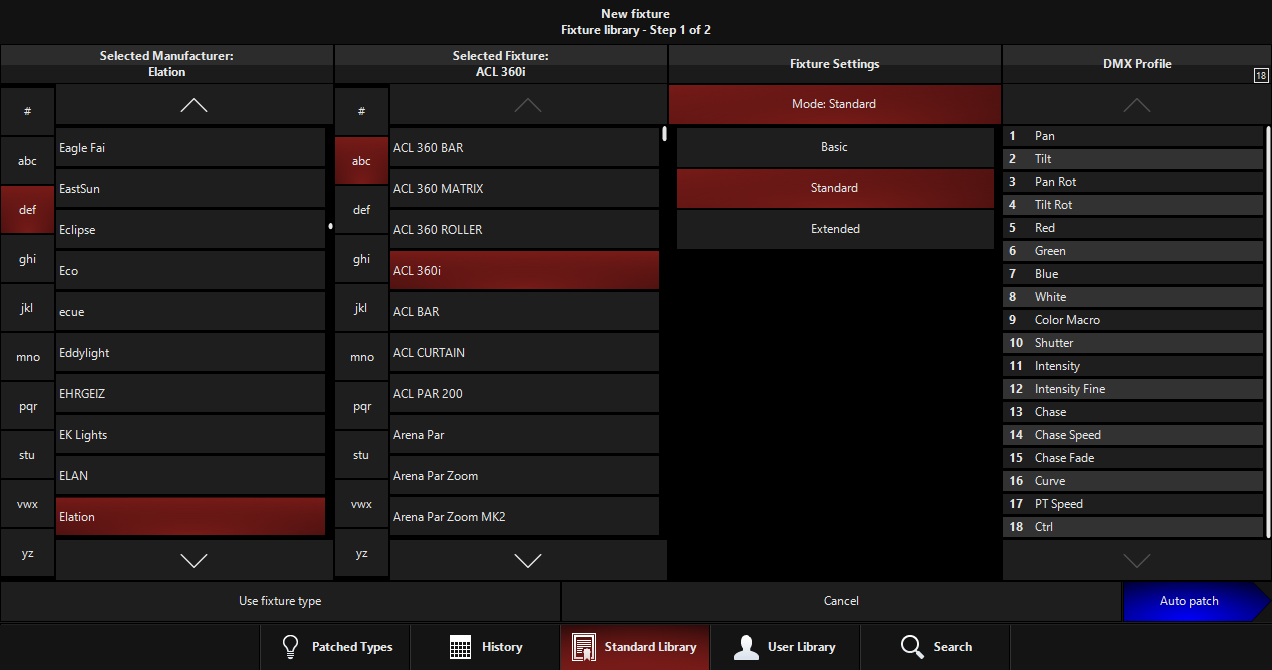
The first tab you see in the Auto Patch popup is the Fixture Library. The library is arranged with manufacturers in the left most column, the fixture type in the second column, the mode in the third column and the DMX protocol readout in the last column.
Navigate to the required manufacturer, fixture and mode by pressing on the available options. You can use the groups of letters to the left of each column to jump through the listings quickly.
Once you have found your fixture and selected the correct mode for your needs, press the blue button in the bottom right hand corner of the window.

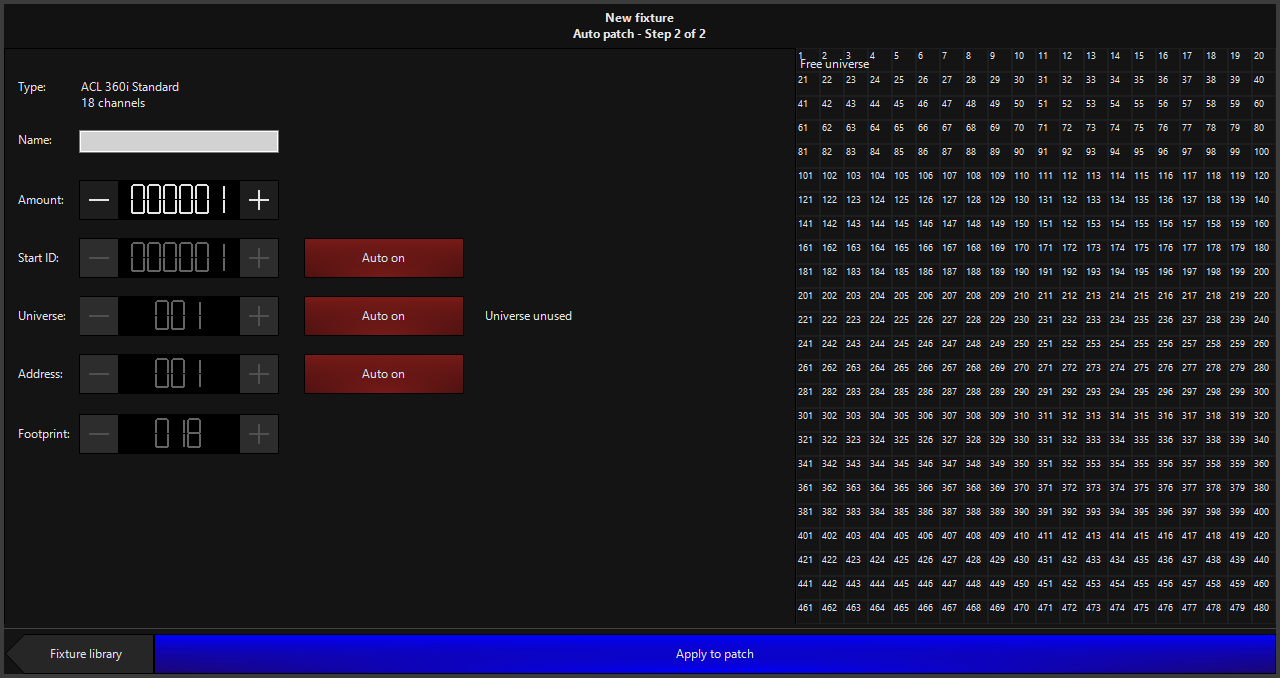
Once in the Auto Patch window, simply set the Amount counter to be the total number of the selected fixture you wish to patch. The Start ID can remain at its default, or be changed to your preference by pressing the button and using the / buttons.
The start ID is the unique "fixture number" assigned to each fixture that you will use to call them up on the keypad. You can also press the number and use the number pad on your computer or console. Double-pressing will popup the on-screen number pad.
The Universe and Address can be changed in the same manner. If you leave them to "auto", the console will choose the first available address.
Press to add the new fixtures to the patch.

The left side of the window is where new fixtures can be configured before they are added. On the right side is the Universe View. This view is populated as fixtures are added and can be used to identify any available DMX channels in the specified universe.
For reference, here are all of the functions of the window:
| Icon | Name | Explanation |
|---|---|---|
|
|
Type | This reads as the fixture type you selected from the library, its mode and the channel allocation it will take up. |
 |
Name | The name field allows you to add a name to the fixture(s). This is a useful feature, as the Console will automatically number the fixtures within the name. For example, adding 8 fixtures and setting the name to "Back Truss" will result in fixture 1 being called "Back Truss 1", fixture 2 being called "Back Truss 2" and so on. |
 |
Amount | Use the and buttons to set the amount. You may also assign an amount directly by touching the number and entering the desired amount using the keypad, or by double tapping the number to bring up an on screen keypad. |
 |
Start ID | This is the fixture ID that will be used for the first fixture added. If is "On" (red), the console will choose the first available start ID. To enter your own start ID, press the soft button to disable it (it will turn gray and read "Auto off"), then use the or soft buttons to adjust the ID of the first fixture. You may also assign an ID directly by touching the number and entering the desired ID using the keypad, or by double tapping the number to bring up an on screen keypad. |
 |
Universe | Here you can choose what universe to patch the fixtures into. If is "On" (red), the console will patch the fixtures into the first universe with an appropriate number of available channels. The console will also display the amount of channels free on the selected universe. |
 |
Address |
Here you can choose the DMX address for the first fixture. If is "On" (red), the console will patch the fixtures into the first available DMX address. |
 |
Footprint |
Here you can place an offset between the patched fixtures. As you enter a footprint that is higher than the fixture's amount of channels, you will see to the right how large of a gap will be left between fixtures. |
 |
Apply to patch | By pressing the button, the console will execute the command and automatically patch the fixtures according to the data entered in the Auto Patch window. |
 |
Fixture Library |
At any time, the New Fixture command can be canceled by pressing the button, then the cancel button. |
 |
Use Fixture Type | Once you have selected the fixture from the Library, you may use this button if you want to bypass auto-patch and patch via the command line. |
 |
Cancel | The button will cancel the operation and return you to the main patch window. |
 |
Patched Types | This button will show you the fixture types already patched in the show in alphabetical order, this makes patching more of the same fixture type quicker. If there are no fixtures patched into the show, this list appears blank. |
 |
History | This button is similar to the "Patched Types" button but it shows the history of fixtures patched on the console since the last software install. |
 |
Standard Library | Here you access the Library that is installed on the console. |
 |
User Library | This tab shows you the fixtures you have made using the fixture editor on the console. |
 |
Search | Here you can search the whole console for a specific fixture. This feature is useful if you can remember the name of a fixture, but not the manufacturer. |