Timecode
ONYX allows for connecting to an external time clock for the synchronized triggering of cues. When using timecode in an X-Net session, the Primary ONYX device will accept and follow the timecode given.
To set up a timecode input please see: Timecode Settings
Timecode Cuelist Header

You will note several buttons available in "Cuelist Values" for the Timecode Cuelist:
| Button | Description |
|---|---|
| 00:00:00:00 | This is where the received timecode is displayed. The format is HH:MM:SS:FF. HH is hours, MM is minutes, SS is seconds and FF is frames. |
 |
The Play button is used to start SMPTE when using the internal timecode generator. |
 |
The Pause button is used to stop the internal timecode generator without resetting it to zero. To resume, press the Play button. |
 |
The stop button is used to stop the internal timecode generator. Pressing this button will cause the clock to reset to 00:00:00:00 |
 |
When set to on, the Cuelist will “listen” to the selected timecode generator and the Cuelist will follow the timecode. When turned off, incoming timecode will be ignored. If turned on while timecode is running, the Cuelist will advance to the last executed cue as determined by the timecode value. |
 |
When selected and a timecode source is present, pressing the console's button will automatically capture the timecode time that the cue was executed and save it with the cue for later playback. Pressing on the Cuelists Go button will simply advance the Cuelist without capturing the timecode time. This is useful if you want some cues to follow timecode, but some cues to be triggered manually. |
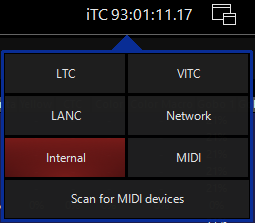
When Timecode is live, you will also see a display near the top right of the main ONYX window. Pressing this display will allow you to quickly switch types of Timecode or Scan for MIDI devices:
Working with the Timecode Cuelist
Setting a Mark Cue
In order for timecode to trigger a Cuelist, that Cuelist must be active.
You must already be running a cue in the Cuelist for timecode to trigger later cues.
This is accomplished by recording a “mark” cue.
In this instance, a mark cue is a cue that contains no information, it simply starts the Cuelist.
An example would be to record a “.5” cue before the first cue in your Cuelist.
This would be a manual cue with no information in it. Any cues that follow that have a timecode trigger would then be executed.
Changing Cue Trigger Times Manually
When you first set the cuelist to the Timecode type, all of the times will be listed as “Manual Trigger.” This means that timecode will not execute the cue.
ONYX allows you to change the trigger time by manually entering the values for hours, minutes, seconds and frames in much the same way you would change the time of a standard cue. Recalling that the format for SMPTE timecode is HH:MM:SS:FF, use the following steps to set the trigger time:
- With on, press or click the legend on the cue you wish change. The command line will read Set Cue xx TC Time
- To set the trigger time to 1 second and 15 frames press 1 1 5 Enter.
- To set the time to 11 hours, press 1 1 0 0 0 0 0 0 Enter.

You can increment or decrement an individual or selected range of cues by using the and buttons.
- To add 5 minutes to an individual or range of cues select the cue timing(s) and press + 5 0 0 0 0 Enter.
- To delete 5 minutes from an individual or range of cues select the cue timing(s) and press - 5 0 0 0 0 Enter.
If you wish, you can reset a trigger time to manual by selecting the desired cue timing(s) and pressing (minus minus) .
Timecode and other Triggers
A timecoded Cuelist will still take advantage of other trigger types such as Follow and Wait.
If a Follow or Wait trigger has been set for a cue, it will override any timecode trigger time that has been set for that cue.
You can also use the Go and Pause/Back buttons for a timecoded Cuelist.
Pressing Go will manually advance the Cuelist. When the timecode then “catches up” to your position in the Cuelist, it will begin to trigger cues based on their trigger time again.
Note that the cues that have already been executed manually will *not* be re-executed via the timecode signal.
Pressing the button will pause your advancement in the cue list.
To resume, press and the Cuelist will jump to the last completed timecode triggered cue.
Copying Timecode Cues
There are two different ways of copying timecode (or any other type) cues. If selected individually and copied to a new cuelist (ex: Copy Cue x Thru y @ Select Button) the specified cues will be copied to the designated Cuelist but without the attached SMPTE timings. To keep the timings with the cues, go to the cuelist directory and in that window copy the entire cuelist as a new cuelist.
Preparing LTC Timecode tracks
To create Linear Timecode (LTC) tracks compatible with ONYX please consider the following criteria:
- The SMPTE signal must have a minimum level of 0.116Vpp (Volts peak to peak)
- The maximum level allowed is 2.12Vpp
- When mastering LTC tracks, use a level of -18db
Problems with SMPTE can be occur due to:
- Hum/noise on the line
- Over-talk when the signal was recorded
Timecode level for LTC can be adjusted from the Timecode Settings