Adding a Background Image
Each 2D Plan Page is also able to feature a background image, which you are able to set transparency to.
This could be your logo, a picture of the plot or stage, or maybe a picture of your cat. Any file in the ".png" format will work.
To set a background image, first enter Edit mode by clicking the Live icon, and then make sure the Options sidebar is open by clicking the Options icon:


The bottom half of the options tab is all about the background image:
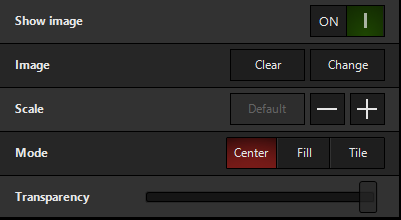
Here, we can first press next to the word "Image". This will pop up a file explorer so that you can locate and select your image. This is also where you can to get rid of any image and have a blank background.
Now you can use the Scale option to make the image larger or smaller.
Mode allows you to either center, fill (ignore zoom), or tile (repeat) your image.
Transparency allows you to make your image partially transparent, so that you can see your lights more clearly.