Using Layers
Like other graphically-oriented programs, ONYX allows you to organize your 2D Plan elements into layers. These layers then help you stay organized as you build your show.
Opening the Layers Tab
First enter "Edit Mode" by pressing the triangle icon labeled Live:

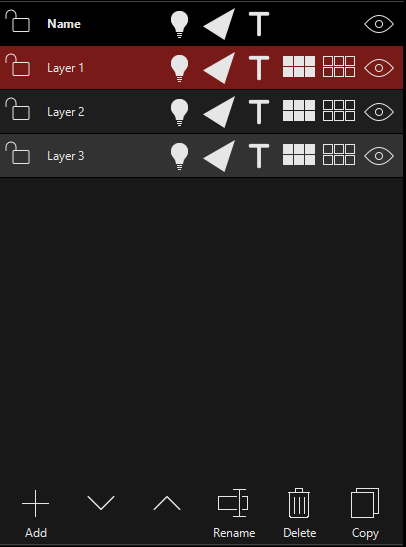
Then, press the Layers icon, in the upper right hand corner of the 2D Plan window, and you'll see this popout:


It may also be helpful to close the options using the options icon if it is open:

By default, your 2D Plan will have 1 layer, but you can add, re-order, rename, delete and copy as well as use some other functions. Once you're done editing, press the icon
Layers Reference
While the icons in the layers tab are quite simple, here is an explanation to how they all work.
Layer Editing Functions:
| Button |
Description |
|---|---|
 |
Add a new layer. |
 |
Move the selected layer up or down. |
 |
Rename the current layer. |
 |
Delete the current layer - you will have to confirm via a popup box. |
 |
Copy selected layer. |
Layer functions available in Live or Edit Mode:
| Button |
Description |
|---|---|
 |
Lock layer - this prevents any changes from happening to the layer.
|
 |
Show/Hide Intensity - hides the intensity indicator in Live mode. |
 |
Show/Hide Beams - hides the beam visualization in 2D. |
 |
Show/Hide Text - hides any text. |
 |
Select All - Selects all fixtures in the layer. |
 |
Deselect All - Deselects all fixtures in the layer. |
 |
Layer Visibility - Shows and hides the layer. |