Editing Presets
As with editing groups, ONYX provides two ways to edit a preset: merging and replacing.
To Add Fixtures to a Preset (Merge)
- Select and focus the desired fixtures.
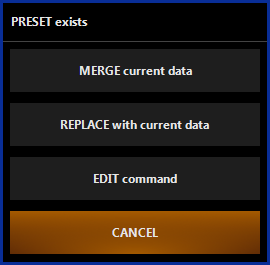
- Press and the button of the preset to which you wish to add fixtures. The following pop-up will appear:

- Select and the appropriate fixture attributes will be added to the preset.
To Replace the Fixtures in an Existing Preset (Replace)
- Select and focus the desired fixtures.
- Press and the button of the preset you wish to replace.
- The following pop-up menu will appear:

- Select and the appropriate fixture attributes will be recorded in the preset.
will abort the command and clear the command line.
will abort the command but will leave the command line active so that you can edit it and then record again.
Editing the Contents of a Preset
Aside from adding and deleting fixtures in an existing preset, you can also change, for example, the position of a pan/tilt preset by updating the contents of a preset.
To edit the contents of a preset:
- Press the button
- Press the preset button on the screen that corresponds to the preset you wish to edit
- Press . This will load the contents of that preset into the Programmer
- Make the desired changes
- Press . The changes will be recorded and the Programmer will be cleared.
When using the edit function to change the contents of a preset, it is important to realize that only those attributes originally recorded into that preset can be altered. It is not possible to add new attributes into a preset with this function. Adding new parameters must be done using the merge command, as discussed above.
Presets and the Update Function
By default, the Update function modifies the contents of a preset if you update a cue that uses that preset. To prevent this, the preset must be deselected before executing the update command. This will be discussed more later on in the chapter relevant to Updating Cues.
Deleting a Preset
To delete a preset, press the button, the desired preset, and then . Alternatively, you can press and hold the button and then select a preset using the touch screen, releasing the delete button after touching the preset will delete it.