OSC
OSC, or "Open Sound Control", is another way to gain remote control of the ONYX controls from external sources.
OSC offers full control of ONYX's main playbacks, playback buttons, F-Keys, command keys, and more!
Note - When using a PC, there are some restrictions on OSC in FREE and NOVA mode. See ONYX PC Modes for more information.
One of the most popular ways to use OSC is via the TouchOSC app, available on tablets and phones - scroll down to see directions specific to setting up the TouchOSC app.
OSC Reference
All supported OSC commands are documented in this PDF: OSC MAPPING V1.20.pdf
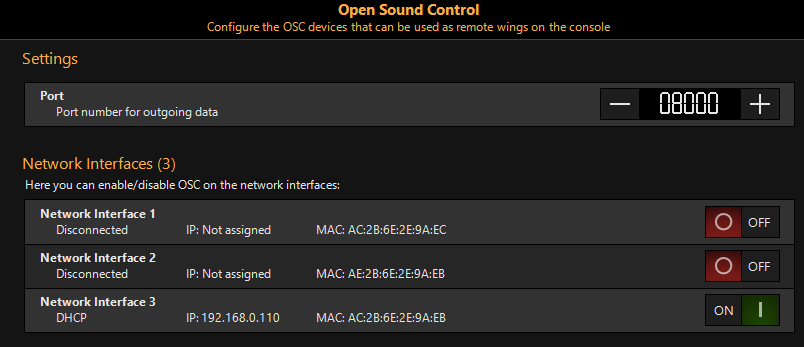
OSC Configuration (Any OSC Device)
To set up OSC on the Console:
- Access the menu by pressing the button or in the upper left-hand corner, then press .
-
Under Network, press , and then press on the bottom navigation. Ensure that the IP Settings are set to "AUTOMATIC" and that OSC is enabled on the "REMOTE" adapter.
-
Press .
-
Navigate to the page.
-
Under enable OSC on the "Remote" network interface.
-
Under , activate the first OSC Device using the Properties options in the right column.
-
Enter a name for the Device - example "iPad Remote"

-
Enter the IP Address of the OSC device. If using TouchOSC, the "Configuration" page in the TouchOSC app will show you your device's IP address.
-
Ensure the Incoming Port used by the OSC device matches the settings on the iPad.
-
Press and .
-
In the Touch OSC app or other device, press the Button on tab 6 (Config).
The console and the remote should begin to communicate.
TouchOSC Setup and Configuration
The "Touch OSC" app, available for iOS and Android devices has a specifically designed ONYX skin designed for iPhone and iPad. Using the app, you can use your device as a remote focus and playback tool for ONYX.
In the folder you will find both a layout sized for iPads and other tablets, as well as one designed for phones.
Before using TouchOSC, be sure to install the TouchOSC application from your device's app store (iTunes, Google Play, Amazon).
Installing Your Layout
There are a few different ways to get your Touch OSC layout installed on your device.
The easiest way to install your layout on Android is to first download it to your device from the link provided at the top of this page.
- Once downloaded, open the TouchOSC app.
- The app will launch to the Settings screen, and you can press "Layout". If your app launched to a layout, press the circle in the upper right hand corner.
- Now press "Add from File". You'll now be able to navigate to your system's download folder, where you may select the layout.
- Scroll down and select the layout you have just added. The layouts are organized in alphabetical order.
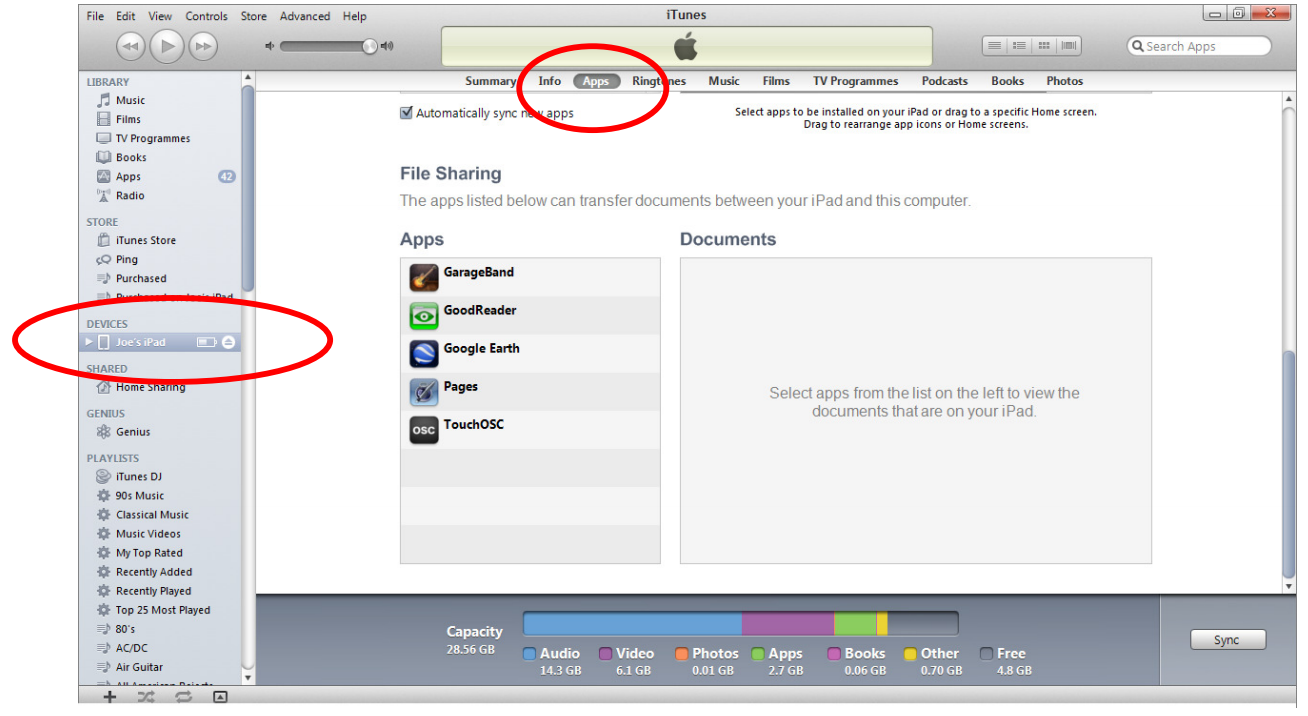
- Select the Device on the left hand side in iTunes
-
Navigate to the Apps Tab
-
At the bottom of that tab is a "File Sharing" area
-
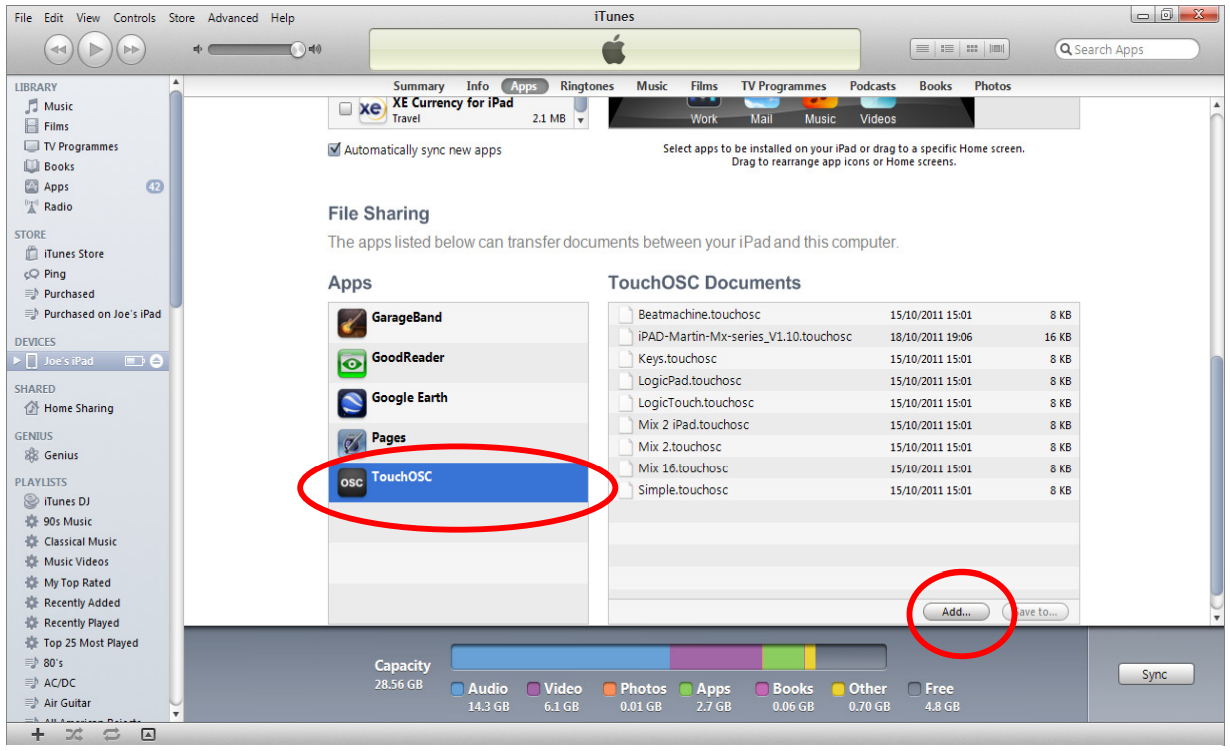
Select the OSC App
-
Hit the "Add" button
-
Browse to the layout you wish to install.
-
Re-Sync the device to iTunes and the layout will be available on the device.
You can also install the TouchOSC Editor program, which allows you to edit and customize TouchOSC layouts, as well as sync layouts from the PC directly to the TouchOSC app. You can download free TouchOSC editor here: https://hexler.net/software/touchosc.
Once you've installed the application on your computer, you can press "Sync" in the top navigation, and a window will pop up with instructions on how to load it into your device over wireless.
Configuring Your Device
- On the device, disable Mobile Data.
- Connect the ONYX "Remote" network interface to a wireless router or access device. Connect the iOS device to the same router/access point.
- Both Console and iOS device should be set to obtain an IP address automatically. For more complex network requirements, assign a static IP Address on the devices accordingly.
Configure the Console
To set up OSC on the Console:
- Access the menu by pressing the button or in the upper left hand corner, then press .
-
Under Network, press , and then press on the bottom navigation. Ensure that the IP Settings are set to "AUTOMATIC" and that OSC is enabled on the "REMOTE" adapter.
-
Press .
-
Navigate to the page.
-
Under enable OSC on the "Remote" network interface.
-
Under Activate the first OSC Device using the Properties options on the right column.
-
Enter a name for the Device - example "iPad Remote"

-
Enter the IP Address of the OSC device. The "Configuration" page in the TouchOSC app will show you your device's IP address.
-
Ensure the Incoming Port used by the OSC device matches the settings on the iPad.
-
Press and .
-
In the Touch OSC app, press the Button on tab 6 (Config).
If you are in FREE or NOVA mode, OSC is locked. However, you may start a free trial on this page of via the licensing popup, for more info see MIDI, Timecode, and OSC Playback Trial.
The console and the remote should begin to communicate.