Setting Split Timing on Cues
Split Cue Timing
ONYX allows for the “splitting” of both fade and delay timing.
When a cue is split, fixtures whose intensity is increasing (up moves), can be set at a different time than those fixtures that are decreasing in intensity (down moves.)
Not only that, but you can apply this timing to any individual attribute inside of ONYX.
Don't gloss over this section of the manual!
Split timings can even be saved to presets and allow you easily build fancy-looking wipes, fades and other transitions across your stage.
Note that the time set for the up move will also act as the base time for the cue.
That is to say that if a cue has an up time of 10 seconds, all attributes of all fixtures will move at ten seconds except where overrides are entered.
The downtime will affect only the intensity attribute of any fixtures that are decreasing in that cue; all other attributes will take their timing from the up time.
To Set a Split Time For A Whole Cue:
- Select the Fade or Delay time cells of the desired cue(s) by clicking and dragging, or touching and dragging the cells.
- Enter the up time, remembering that this will also serve as the base time for the fade or delay
- Press the button
- Enter the downtime
- Press
To Remove a Split Time:
- Select the Fade or Delay time cells of the desired cue(s) as described above.
- Enter the base time desired
- Press
Setting an Individual Attribute Fade Time
Aside from setting base times for cues, you can set specific times for any attribute or attribute group of any fixture or group of fixtures. These times override the base cue timing and range from 0 seconds to one hour.
For our example, we’ll use cue 1 with a base time of 5 seconds but we’re gong to change the intensity timing to zero.
- Select the desired cuelist.
- Select the fixtures who’s fade time you wish to change.
- Select the attribute group with the desired attribute with the attribute group buttons. Use for this example.
- Press the button.
- Press the parameter button.
- Press on the keypad.
Once you have done this, you will see the following in the command line:

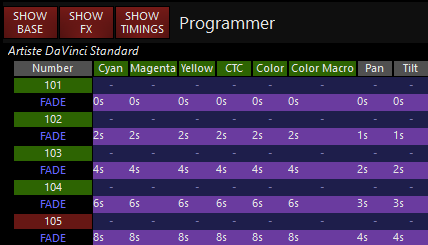
This indicates that the selected fixtures will be set to an intensity fade time of zero. - Press to add the change into the Programmer:
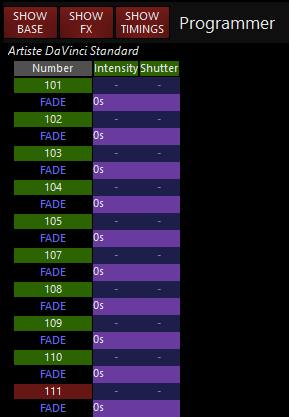
Here we can see that fixtures 101-111 have fade times of 0 seconds associated with them for intensity. So, all the fixtures will now "Snap" on in 0 seconds regardless of the cue fade time. To finish the process: - Press Record Cue 1 Enter and press from the popup that appears.
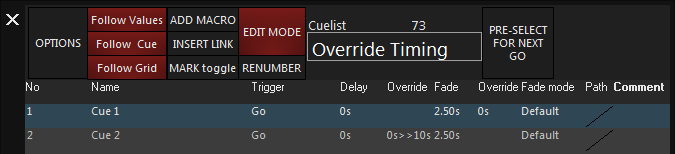
Cue 1 has now been updated with the new cue override times as is reflected in the Selected Cuelist window:

Looking at cue 1, you can see that under the header “Override” to the right of “Fade” a value of “0s” is displayed.
This indicates that at least one attribute on at least one fixture has overridden the default fade time and that it/they have a time of 0 seconds.
Had we programmed it so that half of the fixtures faded-in in time zero while the other half faded-in in 10 seconds, the display would read “0s>>10s.”
Now, let's add some rocket fuel and first record this to a preset:
Follow the previous example, steps 1-7.
Then, press and press a Preset button in the Intensity Presents window to record this as a preset.
Clear your Programmer.
Now, you can simply use the Preset you just created to set your timing as you record cues in the future. If use the command when setting your fade times, you can create some really cool "fan" type transitions on your stage that you can apply really quickly via a preset!
This also works with , in the same manner.
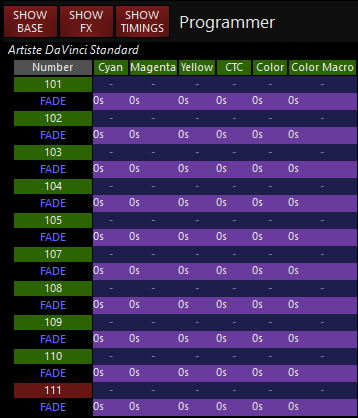
Setting the Fade Time for an Attribute Group
In the example above, we examined how to set a fade time for an individual attribute (intensity). It is also possible to set the fade time for an entire attribute group, such as color.
To do so:
- Select the desired Cuelist.
- Select the fixtures you wish to change.
- Press the button.
- Press the Parameter Button.
- Press (or the time of your choice) on the keypad.
- Press .
We can see that all the color attributes have been set to a fade time of 0 seconds by looking at the Programmer screen:
- Press Record Cue xx to complete the process.
Setting an Attribute Delay Time
An attribute’s delay time is the amount of time between when the cue starts, and when the attribute begins its fade. The attribute delay time is set in much the same way as the attribute or attribute group fade time.
We will program a cue such that the Artiste DaVinci's will move 2.5 seconds using the following procedure:
- Select the desired Cuelist.
- Press the group button to select the fixtures.
- Press the button.
- Press the Parameter Group Button.
- Press to set the pan and tilt delay to 2.5 seconds.
- We can now see that the Pan and Tilt attributes of the Artiste DaVinci's all have a delay time of 2.5 seconds.
To complete this process: - Press Record Cue xx .
Note that a single attribute can have its delay time set by pressing the hard button for that specific attribute in the same way that one would set a fade time for a specific attribute.
Setting a Staggered Delay Time (Delay Fanning)
ONYX makes it very quick and simple to fan the attributes of a group of fixtures. Fanning can be defined as taking a delay time range (such as 0 to 11 seconds) and applying that delay evenly across a group of fixtures.
For example, if you did specify a delay of 0 to 11 seconds and then applied that delay evenly across 12 fixtures, fixture one would begin its move as soon as the cue began, fixture 2 would delay one second, fixture 3 would delay two seconds, etc.
To examine how this works, follow these steps...
- Select the group and press .
- Press and the Select Button on an empty playback control to create cue 1 in a new Cuelist.
- Press the Parameter Group Button.
- Using the tilt track belt/wheel, set tilt to 40%.
- Press the button.
- Press the Parameter Group Button.
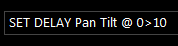
- On the keypad, press 0 Thru 10.
At this point if you look at the command line, you’ll see the following:
- Press . The delay values are now in the programmer.
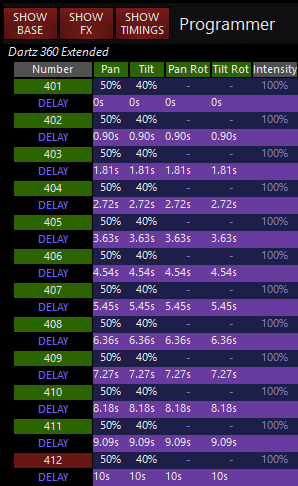
By looking at the Programmer, you can see that the delay time of zero to 10 seconds has been evenly distributed across the 12 fixtures.
To complete this operation: - Press and the Cuelist Selection Button used to create cue 1.
- Clear the Programmer by pressing Clear Clear.
- Press on your cuelist and watch the transition between cue 1 and cue 2 in the 2D Plan view!
And, you can add rocket fuel to your delay times by recording them to a preset first, then a cue, just as described above in "Now, let's add some rocket fuel and first record this to a preset:"
Delay Fanning From Multiple Points
In much the same way that a standard fan is created, you can change the delay time so that the fade will begin at multiple points throughout the selected fixtures.
For example:
- Press Edit Cue 1 Enter.
- Select the desired fixtures.
- Press the button.
- Press the Parameter Group Button.
- On the keypad, press 0 Thru 5 Thru 0 Enter.
- Press .
Now, when cue 1 is executed, you will see that the fan begins from the beginning and end of the selected fixtures and works its way towards the middle. Conversely, had we wished to start in the middle and work out, we would set the delay time to 5 Thru 0 Thru 5. It is possible to use multiple “Thru” commands to construct your fan effect.
Setting a Staggered Fade Time (Fade Fanning)
Fade timing may also be fanned using the same procedures described above for fanning the delay timings.
Changing Cue Overrides
When setting either a standard or staggered fade or delay time, a new field is added in the Selected Cuelist window showing the override time(s) for the affected cue(s).
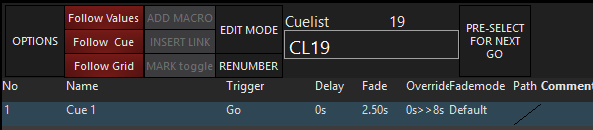
Here we can see that Cue 1 has a fade override of zero seconds and Cue 2 has a delay override ranging from zero to ten seconds. While you can not see here which fixtures are affected - go to the Cuelist Values window - at least one attribute of one fixture will be affected whenever the override column is displayed. Changing these times is done in much the same way that a base fade or delay time is changed.
To change “standard” overrides
- Select the fade or delay override time of the desired cue by pressing or clicking on it. You can also click and drag to select a number of cues simultaneously.
- Enter the new fade/delay time
- Press
To change “ranged” overrides
- Select the fade or delay ranged time (such as 0s>>10s in the example above) by pressing or clicking on it
- Enter the new lower range
- Press
- Enter the new upper range
- Press
Note that when an override time is changed in this manner, any and all fixtures with override times in them will be affected, regardless of attribute category.
If the color and pan/tilt attributes are both set with an override of 5 seconds and the override is then changed to 10 seconds, both color and pan/tilt will be affected.
However, when attributes within a cue are set at different values and the range is changed as described above, those attributes will move in proportion to one another.
Example: Doubling the time:
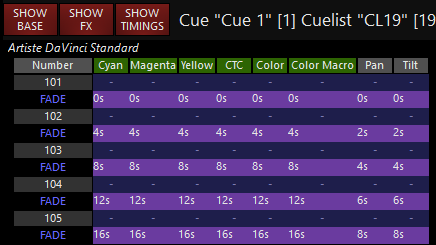
Select five fixtures and assign their color attributes to a fade of zero to eight and their pan/tilt attributes to a fade of zero to four and record this as a cue. When we press Edit Cue 1 Enter we will see Programmer and Selected Cuelist screens similar to this:
We can see that the override timings have been evenly distributed as specified. Now, clear the Programmer (Clear Clear) and, by selecting the fade override cell in the cuelist (remember ), change the timing to 0 THRU 16 and re-record as cue 1. Again press Edit Cue 1 Enter and the following should appear on the Programmer screen:
By taking the original override time from “0s>>8s” to “0s>>16s”, we doubled the fade overrides and they have been increased proportionately and relatively to one another.
Removing Overridden Fade and Delay Times from Cues
To remove an override from an entire cue
- Select the cell(s) containing the override time to be removed
- Press the (minus) button
- Press
It is also possible to remove only some of the overrides in a cue using the Clear Options pop-up (see “ Clear Options ”).
To remove overrides from some fixtures in a cue:
- Press the button
- Enter the desired fixtures on the command line (for example, 1 THRU 6)
- Press @ Cue xx where xx is the cue number to be altered
- Press the button. (The values have been loaded into the programmer)
- Press
- Select the Timing Values option from the Clear Options pop-up window. Also deselect Base Values and Effects Values and apply any other filters desired.
- Press
- Press to update the relevant cue.