MIDI Macros
ONYX implements MIDI commands through the use of macros.
A basic understanding of MIDI and MIDI equipment is strongly advised and is beyond the scope of this document, although enough information will be given for basic MIDI operation.
MIDI Macro Physical Connection
On the back of some ONYX consoles there is a MIDI in and out port, and on others it is available as an optional add-on.
On a PC, any MIDI interface or USB-MIDI interface that can connect to the Windows MIDI drivers can be used as well.
The in ports connect to the output from the MIDI generating device (synthesizer, PC, etc.)
ONYX does not generate MIDI messages, but does pass them along for processing by other MIDI equipment in the system.
MIDI Macro Programming
While MIDI Macros can easily be put into existing Cuelists and can be very useful there, you may find it easier to manipulate MIDI control by using a separate Cuelist or Cuelists.
This is how the examples in this manual will be displayed.
This can easily be done by recording a “blank” cue (a cue when no information is in the Programmer) to an unused bank.
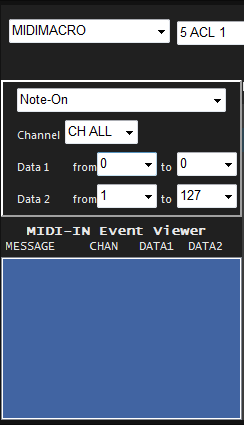
Once done, add a macro to the cue and from the pull down list select “MIDIMACRO.” When you have done this, you will see the “MIDI In Event Viewer."
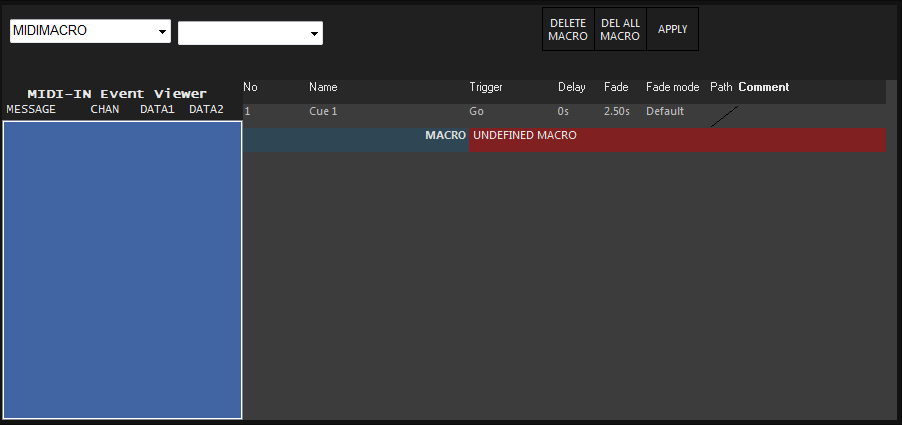
The MIDI-In Event Viewer consists of four columns:
| Option | Description |
|---|---|
| Message | Under this column, you will find what type of MIDI message has been received by the console such as “Note On,” “Note Off,” etc. |
| Channel | MIDI employs 16 discreet channels. This column identifies which channel the message came from. |
| Data 1 |
Every MIDI message consists of a minimum of two data bytes. The meaning of these data messages changes depending upon the message type. As an example, if the message is “Note On” or “Note” off, Data 1 will display the value assigned to a specific note (such as C#). Each note in the MIDI protocol has a specific value assigned to it. Note that the ONYX display is numeric from 0-127 while MIDI protocol is frequently shown as hexadecimal (00-FF). |
| Data 2 | Similar to “Data 1” except that where Data 1 will often identify a object (such as a note in the harmonic scale), Data 2 will define an action for that note such as on or off. |
Once you have your MIDI In Event Window open, you can then test your physical connection by playing or sending a MIDI note from your MIDI device. If your connection is good, the note played will be displayed in the Event Window.
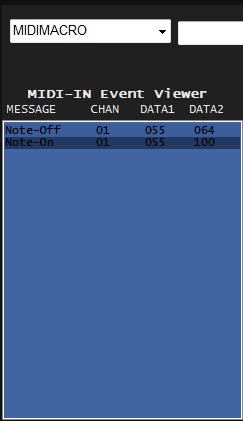
The last message received is displayed at the top of the list.
In the example above you can see that the first message was a Note-Off from Channel 1 where Data 1 was 055 (C#) and Data 2 was 064. The second message was the same except it was a Note-On and Data 2 was 100.
The drop-down menu to the right of the macro type drop-down contains the various Cuelists that the MIDI macro can be assigned to as well as 5 “global” MIDI macros.
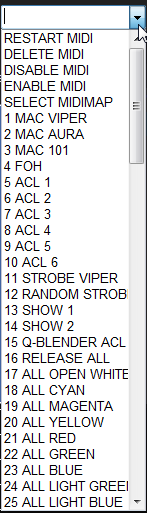
The five global MIDI macros will be discussed later in this section. Once you select the Cuelist you wish to manipulate with the specific MIDI macro you are programming, the screen will change and present you with more options:
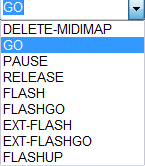
This menu contains 9 different actions:
| Option | Description |
|---|---|
| Delete Midimap | The MIDImap feature is not yet implemented. Therefore, the Delete MIDImap feature is also not yet implemented. |
| Go (default) | This will act as a normal Go command on the cuelist. |
| Pause | This will pause and fade or effect in progress. |
| Release | This will release the specified cuelist. |
| Flash | This will press and hold the flash (bump) button on the specified cuelist. |
| FlashGo | This will press and hold the flash button and then rapidly execute a go command. |
| Ext-Flash | This is similar to a Flash command, except that the level of the flash is determined by the information in the Data 2 field. For example, if you wanted a cue to flash to 50%, you would use a command with Data 2 at 64 such as a Note Off command. |
| Ext-FlashGo | Similar to the FlashGo listed above except that as with Ext Flash, Data 2 is used to set the level of the flash. |
| FlashUp | The FlashUp command is the equivalent of taking your finger off the flash button. By having a separate command for Flash and Flash up, you can maintain the flash without having to continuously hold down a button. |
Remember that MIDI is hexadecimal protocol and as such, has values of 0-127. Fifty percent of 127 is 63.5 which rounds to 64.
Please be aware that all “Flash” commands and “Pause/Release” commands will work with MIDImacros regardless of the setting of the “default button” in Cuelist Options.
You will also notice that below the Cuelist and Command drop down menus that there are some extra options. This section determines what type of MIDI command will act as the trigger for the macro.
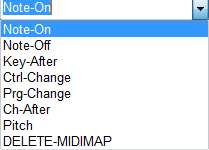
At the top of this section is a drop-down menu with eight MIDI commands.
As discussed earlier, it is beyond the scope of this manual to provide the full specification for all available MIDI commands. However, there are many resources available both in printed media and via the internet.
That being said, for the purposes of demonstration, it is important to understand the following two MIDI commands:
| Option | Description |
|---|---|
| Note-On | This is a MIDI command that signifies the beginning of when a specific note is played. |
| Note-Off | This MIDI command signifies that a specific note is no longer being played. |
You can select any of the commands listed except “DELETE-MIDIMAP”. For our example, we’ll use “Note On.”
Below the MIDI command selection drop-down menu are five smaller drop-down menus:
| Option | Description |
|---|---|
| Channel | As mentioned earlier, MIDI supports 16 discreet channels. You can use this drop-down menu to determine which channel the console will “listen” to for its MIDI message for this macro. |
| Data 1 “from” and “to” | These two fields are used to determine the range of Data 1 messages to be acted upon. MIDI ranges from 0-127. You can enter either a very specific MIDI command (from 45 to 45) or accept any MIDI Data 1 command (from 0 to 127). |
| Data 2 “from” and “to” | These fields are used as above, except they pertain to Data 2. |
If we were to select the MIDI command “Note On,” set our Channel to 1, Data 1 from 55 to 64 and Data 2 from 1 to 127, we would execute a Go command on Cuelist 5 every time the keyboard played C#. This is a lot of data to enter, but there is a shortcut.
Instead of entering all the MIDI data manually, once the MIDI Macro has been set up with its Cuelist selection (cuelist 9) and action (Go), you can play the desired key on the keyboard. It will show up in the MIDI In Event Viewer and you can then click on it and the data will be loaded into the appropriate windows.
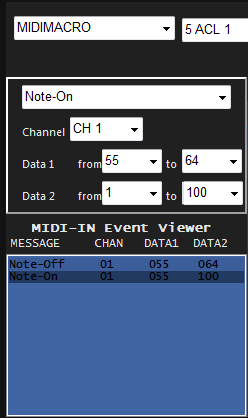
By clicking on the command in the MIDI In Event Viewer, the command , the channel number and the Data 1 and 2 information are automatically pasted into their respective fields.
When all information for your MIDI Macro has been entered, the screen will be similar to this:
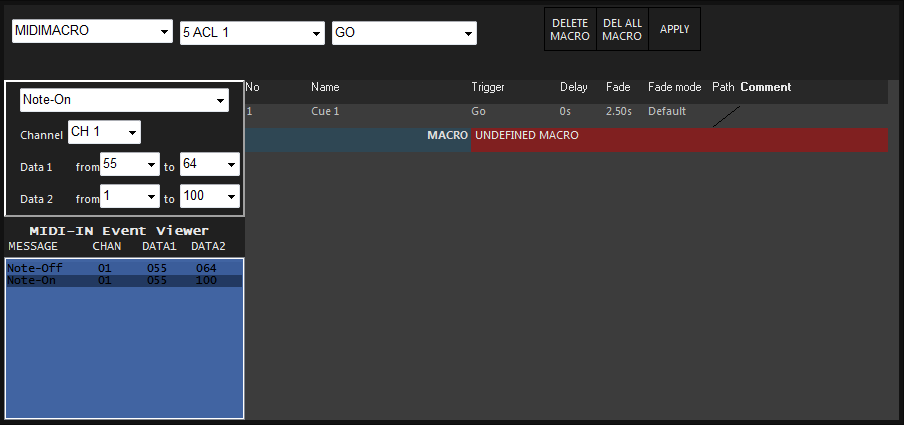
You can see that the Macro is a MIDI Macro that will send cuelist 5 a Go command when it sees a Note Off command on MIDI channel 1 with Data 1 at 55 (C#) and any value in Data 2. Pressing will complete the macro.
Playing MIDI macros
As with any other type of macro, in order for a MIDI Macro to become active, the cue that it is attached to must have been executed. Also, be aware that if you are using any of the “flash” MIDI Macros, the target cuelist (such as cuelist 5 in the example above) must be active for the flash to work.
Global MIDI Macros
As mentioned earlier, there are five global MIDI Macros. A global MIDI Macro is one which affects all other MIDI Macros that the console is processing.
| Option | Description |
|---|---|
| Restart Midi | This function is not currently implemented. |
| Delete Midi | This MIDI Macro will stop (release) all MIDI Macros from acting on received MIDI commands. In order to order for MIDI Macros to once again act on incoming MIDI messages, the cues that the MIDI Macros are attached to must be executed again. |
| Disable Midi | Disable MIDI will ignore all incoming MIDI messages without actually stopping other MIDImacro cues from playing. |
| Enable Midi | If MIDI has been disabled, the Enable MIDI macro will allow the Console to once again act on incoming MIDI messages. |
| Select Midi Map | This function is not currently implemented. |
When working with MIDI Macros, you may find it useful to create one Cuelist that has Disable Midi and Enable MIDI Macro cue in it and a second Cuelist that has a Delete MIDI Macro in it. In this way, you can easily pause and then resume and MIDI Macros or cancel all running MIDI Macros.
A Note about Deleting Midi Macros and Cuelists
Once a MIDI Macro has been executed, it will continue to accept incoming MIDI commands even after the cue containing the MIDI Macro or the Cuelist continuing the MIDI Macro has been deleted. The only way to stop the MIDI Macro from accepting MIDI commands short of rebooting the Console is to use the Global MIDI command of Delete MIDI.
MIDI Macro Summary
Step-by-step example of how to create a MIDI Macro.
- Create a new cue (either a blank cue or not)
- Press
- Press on the cue
- Select from the drop-down list
- Select the target cuelist that the MIDI Macro is to affect from the drop-down list (or select desired Global MIDI Macro)
- Select the action to be taken on the target cuelist (such as Go)
- On your MIDI generating device, send the MIDI command you wish to have activate the MIDI Macro
(Alternatively, you may manually enter the MIDI command values) - From the MIDI In Event Viewer, select the MIDI event and click on it
- Press to record the macro
MIDI Timecode (MTC)
MIDI Timecode is also supported. For more information, please see “ Timecode ”.