Moving a Cue
It is possible to move a cue from one position in a Cuelist to a different position in the same Cuelist.
It is not possible to move a cue from one Cuelist to another. (However, if you need to do this, you can simply play that cue back, and use the Load function, and record as a new cue)
Moving is similar to copying a cue except that the cue is “cut” from its original position and “pasted” to the new one.
To move a cue:
- Select the desired Cuelist
- Press MOVE CUE X @ Y ENTER where "X" is the original cue number and "Y" is the new cue number.
As with copying a cue, it is not possible to move a cue to an already existing cue. If you attempt to do so, you will see the following warning:

If however it is a valid command you will receive the following notification:
![]()
Pressing will abort the command and the cue will remain in its original position.
Pressing will complete the command and the cue will move to the new position.
When a cue that has been linked to by another cue is moved, the link will automatically update so that the link remains intact. That is to say, if cue 10 has a link to cue 4 and then cue 4 is moved to cue 6.1, cue 10 will now link to cue 6.1.
Warning:
Moving a cue can result in a change in the tracking order! If the first cue in a Cuelist is moved to the last cue in the cuelist, the second cue will likely look different than it did before the move. Use this command with caution.
Moving a Range of Cues
As with copying cues, it is possible to move a range of cues. And, as with moving a single cue, it is not possible to move a range of cues to a position that would cause an overlapping of an existing cue or cues. Again, similar to copying cues, “insert cues” can be created, but there are certain options.
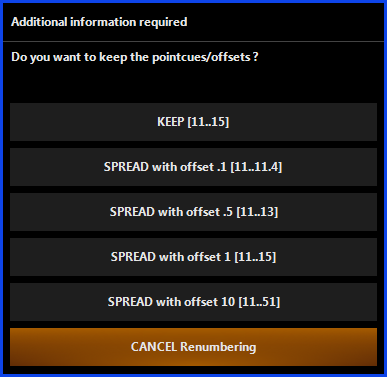
To understand how moving a range of cues works, for each of the examples below, again create a cue list with 10 cues in it. When complete, select the Cuelist and press Move Cue 1 Thru 5 @ 11 Enter. The following pop-up window will appear:
A number of different options as to the number of the moved cues is now presented. Before we dive into those, note that there will be a warning displayed once you do choose how you want to move the cues, explaining that the tracking order will be changed:
![]()
This means that any tracking from previous cues that did happen before, will move with the cues - so you might get something that looks very different from what you had before! Consider the consequences for a moment, then press if you still want to move the cues.
Let's dive in to the options:
-
- This option will keep the original series separated by the same numeric value specified before.

You can see that cues 1 through 5 are no longer in the cuelist, but have been moved to the bottom of the cuelist. The “Keep” option also maintained their previous numeric relationship to each other. For example, cue 1 is now cue 11, cue 2 is now cue 12, etc. As with copying a cue, the original cue names have not changed. -
- All cues, regardless of their original numbering (i.e. whole numbers or insert cues) will be forced to increment by “.1” with each cue as shown:

- You can see again that cues 1 through 5 are no longer in the cuelist but have been moved to cues 11 through 11.4 with each cue being incremented by .1.
- - Similar to “Spread with offset.1” except that each cue to be moved will be incremented by .5. For example, if the first cue is set to 11.3, the next will be at 11.8 and so on.
- - Each cue to be moved will be separated by 1 full step. Again, if the first cue is set to 11.3, the next will be at 12.3 and so on, regardless of their current offset/separation.
- - Each cue moved will be incremented by 10 from the first cue. If the first cue is 11.3, the next will be 21.3, etc.
- - This command will cancel the move and leave the cues in their original position within the cuelist.
Move options that are not viable will not be highlighted. If for example you were to move cues 7 through 9 to cue 6.1, the would not be available as an option.
It should be noted that it is possible to move a range of cues into any range where it will fit, even if some of those cue numbers overlap. For example, again create a cuelist with 10 cues numbered 1 through 10 and then delete cue 4. You can now move the remaining cues to fill the void left by cue 4 by pressing Move Cue 5 Thru 10 @ 4 Enter. The cuelist will now be numbered sequentially from cue 1 to cue 9.
If a cue range is moved that contains a cue or cues that have been linked to by other cues, the link(s) will automatically update so that the link(s) remain intact. That is to say, if cue 10 has a link to cue 4 and then cue 4 is moved to cue 6.1, cue 10 will now link to cue 6.1.
Warning:
As with moving a single cue, moving a range of cues can result in a very different cuelist!