Updating Cues
The Update function is a powerful tool for applying values in the Programmer to cues and presets. If you don’t know what you’re doing, though, a quick Update Update can have some unexpected consequences and make a mess of your cuelists and presets in a jiffy!
How the Update Function Works - Assigned Vs Unassigned Values
In order to understand how Update works, we need to introduce two more terms: assigned values and unassigned values.
An assigned value is a non-null (0-100%) value for any fixture attribute that is under the control of an active Cuelist.
An unassigned value is a non-null value (0-100%) for any attribute that is not under the control of an active Cuelist.
It will all be much clearer if you follow this example:- Select 2 Artiste DaVinci's.
- Bring them up to full intensity and record a cuelist called “Full”.
- Bring up a color and record the color attributes to a second cuelist called “Color”.
- Clear the Programmer and release the Cuelists. (They should be in this state if you did not press .)
- Press the button on your “Full” playback to make the Cuelist active.
- Select the two DaVinci's, bring them to 50% intensity, and give them a really cool color in the Programmer.
At this point, “Full” is active and outputting dimmer levels, “Color” is inactive, and the Programmer look something this:
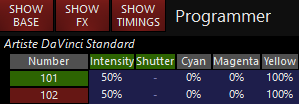
The intensity attribute values for the two fixtures are assigned values because the dimmer levels are under the control of the “Full” Cuelist. The CMY values are unassigned values because nothing else is controlling the color channels.
The Color Cuelist is inactive. If you now started the Color Cuelist, the CMY values would go from being unassigned to being assigned.
Hold on to those cues, we’ll use them again in a moment!
Default Update Behavior
By default, the Update function does three things:
- It overwrites the existing fixture attribute values in an active cue with the values in the Programmer that are assigned to it.
- If the attribute values in the cue are linked to presets, it modifies the presets as well.
- It merges unassigned values into the current cue of the selected cuelist. The selected cuelist must be active. If it is not active, Update leaves unassigned values in the Programmer.
The re sult of an Update depends on which cues and Cuelists are active, which Cuelist is selected, and even whether or not the selected Cuelist is active.
If more than one active Cuelist controls the attributes, latest takes precedence.
It’s a bit complicated, but ONYX tells you exactly what’s getting updated in a window that pops up when you press Update. It’s one you shouldn’t ignore!
Lets get back to our two Artiste DaVinci's and try a few simple examples to see how Update works. Start again with intensity and color values in the Programmer.
Example 1: “Full” and “Color” are active. No Cuelist is the selected Cuelist
Start the “Full” and “Color” Cuelists and press the Select Button on an empty playback so there is no selected Cuelist.
Pressing once will show the Update Options pop-up:
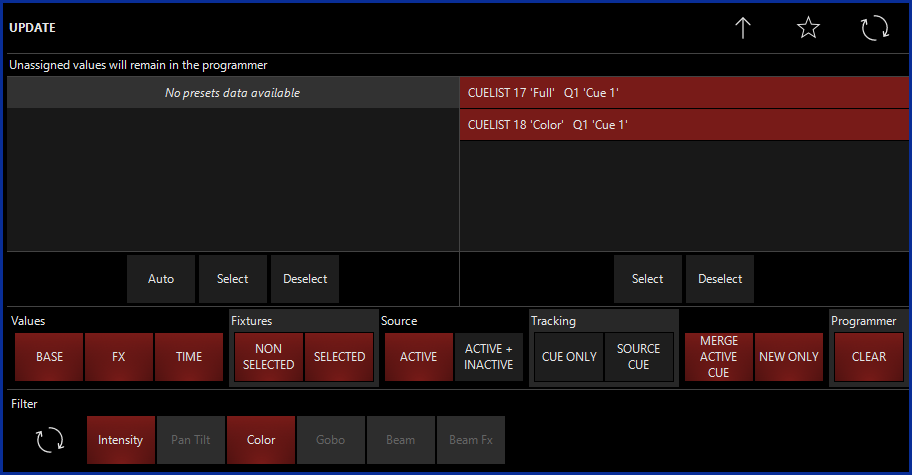
In this case, because both cuelists are active, all values are assigned. The field on the right informs us that cue 1 in “Full” and cue 1 in “Color” will be updated.
You can deselect either or both of the cuelists at this point. If you do, the assigned values will remain in the Programmer. Otherwise, pressing Update or Enter will replace the intensity level in “Full” and the color levels in “Color”.
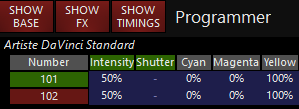
Example 2: “Full” is active, “Color” is inactive, no Cuelist is the selected Cuelist
Set up the same situation but this time release the “Color” Cuelist.
Pressing brings up this window:
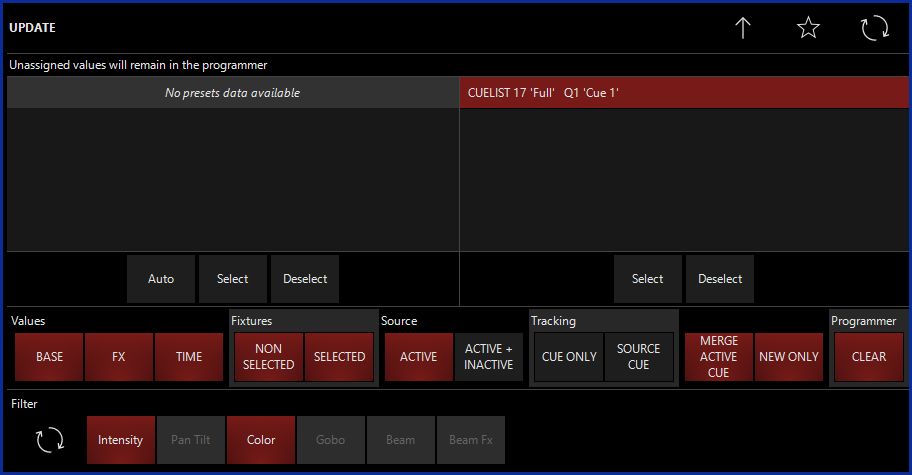
The pop-up tells us only “Full” will be updated. The color levels are unassigned and looking for the selected Cuelist, but there is none so they remain in the Programmer. A look in the Programmer after pressing will confirm this.
Example 3: “Full” is inactive, “Color” is both active and the selected Cuelist
This time press to deselect and press the button for to make it the selected Cuelist. Now press a Go button at the top of the playback control.
Guess what happens when we press ?
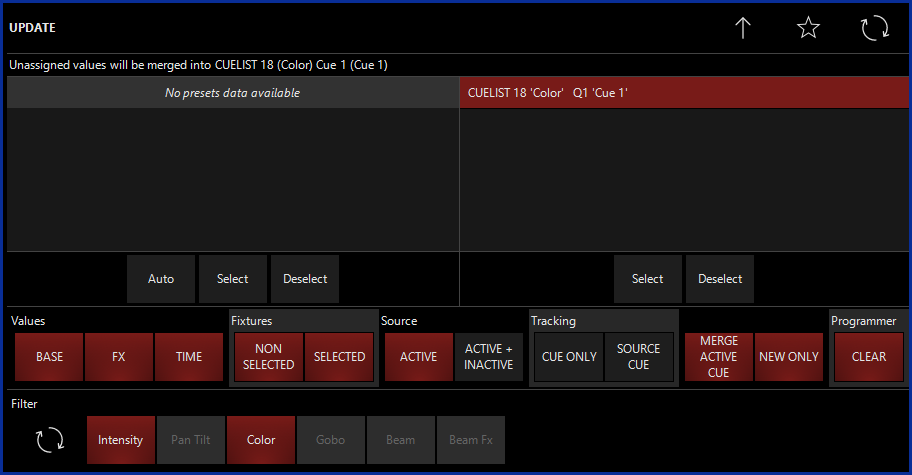
Because “Full” is inactive, the intensity levels are unassigned. The fine print at the top says that unassigned values will be merged into CUELIST 18 (Color) Cue 1 (Cue 1)
Press and then take a look at cue 1 of “Color”.
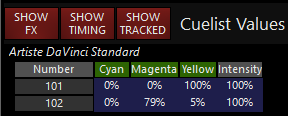
There are our intensity values in the “Color” cuelist. Think about this for a moment.
Update merges all unassigned values in the Programmer into the current cue of the selected cuelist (if it’s active).
Now that’s an easy way to edit a cue, whether you intend to or not!
This behavior, though, can be disabled by deselecting the option in the Update Options window.
Example 4: Neither “Full” or “Color” are active, a third cuelist is active and is the selected cuelist.
In this case, both the intensity and color values are unassigned and the update will merge them into whatever cuelist is currently selected, if it is active.
Updating and Presets
If attribute values are linked to a preset, Update will also replace the values in that preset. You can prevent this, however, by deselecting the presets in the pop-up window.
Say you have a cue that uses a pan/tilt preset for the drum riser in an active Cuelist and then you load the cue’s fixtures into the Programmer, change the pan and tilt values, and update the cue. The cues/presets selection window might look something like this:
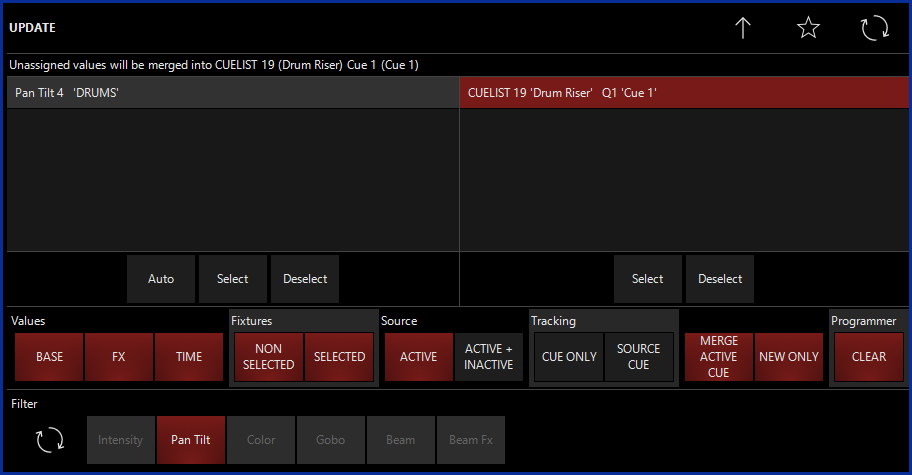
As you can see in the “Presets” field on the left, Update can update the "Drums” preset as well as the Cuelist 19. However, we don't have Pan Tilt 4 'DRUMS' selected in red, so only the cue will be updated.
We can select and deselect any cuelists that show up in this window to decide whether or not we want to update them. If I want to update my 'DRUMS' preset, I can just press it and it will be highlighted in red like the Cue on the right.
Update Options
Except when editing a cue (where Update performs a little differently), the “Update Options” appear when you press Update as part of the overall Update window. It's at the bottom:
Lets look at the different categories.
Values Category
These three filters determine which attribute types will be updated. All of these filters default to ON.
| Option | Description |
|---|---|
| BASE | When selected the “Base Values,” those defined in the Intensity, Pan Tilt, Color, Gobo, Beam, Beam Effects and Framing attribute groups found on the attribute group buttons will be updated. |
| FX | When selected, the “FX Channels,” those defined in the FX and FX Timing attribute groups found on the attribute group buttons will be updated. |
| TIME | These values are associated with the “Delay” and “Fade” overrides used to control when and how long a particular attribute will move. For more information, see “ Setting an Individual Attribute Fade Time ” and "Setting an Attribute Delay Time” . |
Fixtures Category
This category allows you to determine which fixtures in the Programmer are used in an Update function and what happens to those attributes in the Programmer when the function is executed. All of these filters default to ON.
| Option | Description |
|---|---|
| SELECTED FIXTURES | When enabled, attributes for all fixtures selected in the Programmer will be updated. |
| NON SELECTED FIXTURES | When enabled, attributes for all fixtures that are not selected in the Programmer will be updated. |
Source Category
This is similar to the Update Rules category except, instead of determining which fixtures will be used, here we select which attributes will be used.
| Option | Description |
|---|---|
| ACTIVE ONLY (default ON) | Attributes that are active (i.e. displayed in the Programmer in white) will be updated. |
| ACTIVE + INACTIVE (default OFF) | Both active and inactive attributes will be updated. |
Tracking Category
These options allow us to work with tracking from the cues around the cue we're updating. It'll make more sense in the description below.
| Option | Description |
|---|---|
| CUE ONLY |
The "CUE ONLY" button breaks the normal updating method. ONYX is a tracking console. That is to say that when a change is made, it tracks that information forward though the cuelist. There are occasions when you may wish to update information into only one specific cue without it tracking forward. The “Cue Only” button will allow that. When selected, information that is recorded into that cue will not track forward to the next cue(s). It will be contained only within that cue. The one exception to this is when you use "Cue Only" on the last cue in the cuelist. In that case, the information will track forward if a new cue is added later. |
| SOURCE CUE |
This option will track backwards any changes you've made to values that were previous tracked from a different cue. For example, you are editing Cue 8, and dimmer number 4 was at 50%, but is now at Full. You select SOURCE CUE when updating, and ONYX looks back and finds that dimmer number 4 was placed at 50% back in Cue 5. ONYX now goes ahead and changes the value for dimmer 4 back in Cue 5, and that continues to track forward as previous. As you may see, this can be really powerful, and allow you to update many past cues at once! |
Extra Options Category
This category contains options that don’t fit into the other categories. Both of these options default to ON.
| Option | Description |
|---|---|
| MERGE ACTIVE CUE |
By default, unassigned values in the Programmer will be merged into the current (active) cue of the selected Cuelist. If this option is turned off, only assigned values will be updated and any unassigned values will remain in the Programmer. |
| NEW ONLY |
When you deselect a cuelist in the Cues / Presets Selection window, its assigned values normally have nowhere to go and remain in the Programmer after an update. When “New Only” is turned off, though, these unloved values will merged into the current cue of the selected cuelist. |
Programmer Category
This category allows you to determine which fixtures in the Programmer are used in an Update function and what happens to those attributes in the Programmer when the function is executed.
| Option | Description |
|---|---|
| CLEAR |
By default, when you complete an Update command, the Programmer will be cleared. Deselecting this option will leave all attributes in the Programmer. |
Filter Category
These filters determine which attribute groups will be updated.
| Option | Description |
|---|---|
| Intensity | Attributes in the Intensity attribute group will be updated. |
| Pan Tilt | Attributes in the Pan Tilt attribute group will be updated. |
| Color | Attributes in the Color attribute group will be updated. |
| Gobo | Attributes in the Gobo attribute group will be updated. |
| Beam | Attributes in the Beam attribute group will be updated. |
| Beam Effects | Attributes in the Beam Effects attribute group will be updated. |
| Framing |
Attributes in the Framing attribute group will be updated. |
 |
Using this icon resets any filters you've selected and sets the options back to the default. |
Update Options Save and Reset
In the upper right hand corner of the Update window, we see 2 icons that we can use to save our favorite Update settings to default:
| Option | Description |
|---|---|
 |
Show/Hide the Update Options under the Preset and Cue Selector section of the Update window. |
 |
Causes the console to “remember” any of the filters you have applied so that the next time you press Update, those same filters will be selected. Note: there is no feedback when you press this button (it doesn’t change color). |
|
|
Causes the Update Options window to return to its default filter setting. |