FX Controls
ONYX handles effects as an extension of the fixture parameters. Every parameter has its own individual FX section to modulate its values, which are stored as regular parameters.
Because of this, FX are able to be manipulated using the different Cuelist Types, as if they were any other parameter.
FX values can also be stored without base value which allows flexible, on the fly adjustment and mixing of effects as well as complex effects speed and effects size control when working inside a cue list. Effects can be stored and recalled from a dedicated FX Macros directory.
ONYX utilizes a very powerful Effects Engine.
You can use either pre-programmed shapes or work on an attribute-by-attribute level to design your own.
FX are created using the attribute controls.
While going through this section of the manual, it will be quite useful to be at your ONYX software or console.
Some terms and concepts that might not be familiar to you will be much easier to grasp if you can follow along and try programming a few effects of your own.
Please note: ONYX handles all attributes the same with the exception of pan and tilt. Pan and Tilt receive a special treatment when “PT Combo” is enabled.
Making Your First FX
Making an FX in ONYX is very simple.
- First, we select fixtures and work with the last-used parameter.
- Set a Base (or Not)
- Set the FX Parameters
- Set the FX Timing Parameters to Offset the FX
- Optional: Use Effect Grouping
- Pan/Tilt and “P/T Combo”
- Program FX inside of Cuelists
Select Fixtures and Work With The Last-Used Parameter
The last parameter you altered will be displayed at the top of the Parameters window or CV encoders as "[X] on [Parameter]":

It is this parameter that will be affected by an effect once you enter the FX section of the console. If you don't want to use the parameter you last altered, you can choose another parameter by pressing its associated parameter button.
Once you have selected the parameter you wish to apply an effect to, you will need to enter the FX section of the encoders by pressing the button:
The FX engine has two sections.
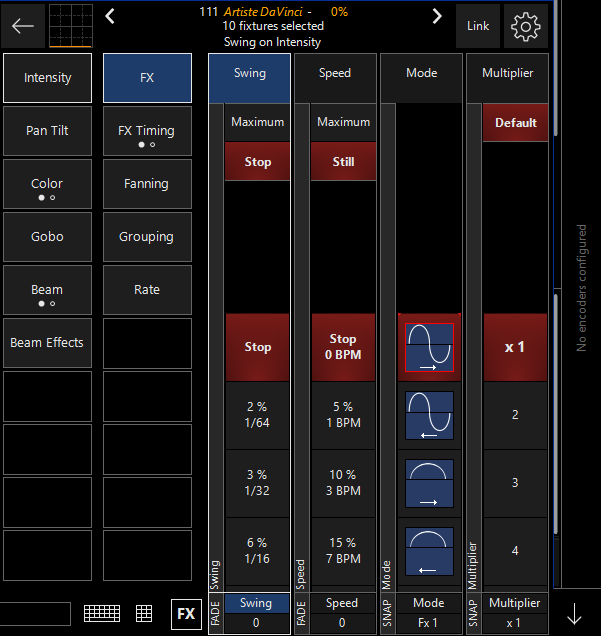
The first is "FX", which consists of the Swing, Speed, Mode and Multiplier controls which form the basis of any FX.
The parameter group below that is "FX Timing" which hosts the Wave Per X, Step Per X, Effect Grouping Tools, and Delay, Shift, and Wait controls.
Load a group of fixtures into the Programmer and press the button. This loads the control elements for the motion of the attribute being controlled by the effect.
The elements are: Swing, Speed, Mode and Multiplier.
Base - Where the FX Begin
All FX elements in ONYX work off the base of the selected attribute.
The base is simply the value for that attribute before any FX are applied.
So for intensity, the base can be anywhere between zero and full.
When we apply an FX element to the intensity, it varies the intensity in relation to the base.
Therefore, if we use an FX that takes the selected attribute up from its baseline to 100% but that attribute’s baseline is already 100%, the effect element won’t have any affect on the attribute.
To put it another way, if fixture 101 is at full and we apply an effect element that goes from zero to 100% and back to zero, we won’t see any change in the fixtures intensity.
If however, the fixture were at zero, we would see the intensity rise and fall with the effect.
Setting the FX Parameters
Swing (Size)
Swing can be described as the amount of the FX to be applied to the attribute.
In audio terms, it would be described as the amplitude.
As stated earlier, it affects the selected attribute based on that attributes base value.
Swing can be set anywhere from "Stop" (a value of 0% to over 250% (Maximum - a numerical value of 170). While you can't get real world attributes of your lights to go over 100%, you can set them this way in FX, and then the effect will sit at the end of the parameter's range until it falls back below 100%.
Visually, you'll see the effect come to the end of the parameter's range and then pause for a minute, continuing shortly after.
Speed
Speed determines how fast the selected attribute will execute its swing value.
Again in audio terms, it would be best described as frequency.
While the base of an attribute does not have a great impact on how speed affects the attribute, physics and the mechanics of the fixture certainly do.
If you set a moving head to execute 540 degrees of rotation in 1/4 of a second, it’s probably not going to happen!
Instead, the fixture will move back and forth off its base position a very small amount as the swing value cycles back and forth past it faster than the motors can move.
The Speed element can be set from 0% (Stop) to 100% (360 BPM).
Multiplier
Multiplier is a further speed parameter. Multiplier simply multiplies the speed of the effect by the number in the counter.
Multiplier is useful for obtaining extremely fast speed values for intensity and color effects on LED fixtures.
It's also handy if you want to have 2 similar FX, but one runs at twice the speed, no matter where you Global Rate is set. You would set the "2X" version of the effect with a multiplier of 2, and all other FX parameters the same.
Mode
The Mode element determines the relationship between the baseline of the attribute and the swing element. These Modes are presented graphically. Below is an example of a Mode with notes to help in interpreting it.
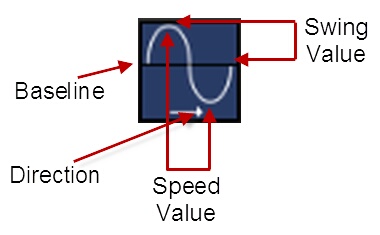
Double clicking the button below the Mode parameter will open up the Mode window so that all of its contents can be easily viewed. In ONYX you may double click the parameter on screen to open the pop-up.

| There are 22 modes available in ONYX. | |
 |
Start at the baseline, fade up the amount specified by the swing element, return to the baseline and then fade below the baseline the same amount before returning to the baseline and starting again. |
 |
Identical to mode one except that we fade below the baseline first and the direction of travel is right to left. |
 |
Start at the baseline, fade up the amount specified by the swing element and fade back to the baseline. |
 |
Identical to mode three except the direction of travel is right to left. |
 |
Start at the baseline, fade down the amount specified by the swing element and fade back to the baseline. |
 |
Identical to mode five except the direction of travel is right to left. |
 |
Start at the baseline, snap (time zero) up the amount specified by the swing element, and then snap below the baseline the same amount before snapping above the baseline again. |
 |
Identical to mode seven except that we snap below the baseline first and the direction of travel is right to left. |
| Modes 9 through 12 require the use of the "Step per X" or the "Shift" element to function correctly. | |
 |
Start at the baseline, snap up the amount specified by the swing element, and then snap back to the baseline. Changes in the modified attribute are applied from first to last selected fixture. |
 |
Similar to above, except changes are applied from last to first selected fixture. |
 |
Starts at the baseline and then snaps down the amount specified by the swing element and then returns to the baseline. Changes in the modified attribute are applied from first to last selected fixture. |
 |
Similar to above, except changes are applied from last to first selected fixture. |
| Modes 13 and 14 are effectively the inverse of modes 7 and 8. | |
 |
The inverse of mode 7... Start at the baseline, step down the amount specified by the swing element, return to the baseline and then step above the baseline the same amount before returning to the baseline and starting again. |
 |
Identical to mode 13 except the travel is right to left. |
 |
Starts at the baseline then snaps up to the amount specified by the swing value then fades back down to the baseline. |
 |
The inverse of mode 15, we fade up to the amount specified by the swing value then snap back down to the baseline. |
 |
Starts at the baseline then snaps down to the amount specified by the swing value then fades back up the the baseline. |
 |
The inverse of mode 17, we fade down to the amount specified by the swing value then snap back to the baseline. |
 |
Linear based saw mode. Start at the baseline, fade up the amount specified by the swing element, return to the baseline and then fade below the baseline the same amount before returning to the baseline and starting again. |
 |
Identical to mode 19 except that we fade below the baseline first and the direction of travel is right to left. |
 |
Ramp mode. Starts at a value below the baseline specified by the swing value, snaps through the baseline to the upper value specified by the swing value then fades back to the baseline. |
 |
Ramp mode. Starts at a value below the baseline specified by the swing value, fades through the baseline to the upper value specified by the swing value then snaps back to the baseline. |
FX Examples
Example #1
- Select any moving light and bring it to 50%.
- Making sure that “intensity” is the selected attribute, set the Swing level to 100%.
- Set the speed to 20%.
You’ll note that the fixture is now fading from zero to full.
We set intensity attribute to a base of 50%. We are in mode 1 which swings above and below the baseline. Since our base is 50% and our swing is 100%, when the intensity attribute is at the top of the modes shape, we're at full intensity. When we reach the bottom of the mode, we’re at zero.
Example #2
- Continuing with the first example, double press the attribute button to open the mode picker.
- Select mode #3 from the drawing above and close the mode window.
You can now see that our fixture is cycling between 50 - 100% - Take the fixture’s intensity to full.
While it appears the effect has stopped running, it hasn’t. Mode #3 never goes below the baseline and our baseline is now 100% (full), so there’s no effect on the intensity attribute. - Open the mode window and select mode #5.
Predictably, the fixture is now cycling between 50%-100% again. - Change the swing value to 200%.
And again, the intensity is changing between zero and full.
Example #3
- Select the “Tilt” attribute, and then click the FX parameter group twice to view the second page of attributes.
- Set "FX Mode" to "P/T Combo Off"
- Press the "FX" parameter group to return to the first page of attributes.
- Set Swing to 13% and Speed to 20% (12 BPM).
The fixture should now be swinging back and forth. - When the fixture next reaches the end of a swing, change the speed to 0% (Stop).
You’ll note that the fixture has stopped, but it’s not at its base. The effect is still “running” but it has, in a manner of speaking, “frozen in time.” - Return the speed to 20% (12 BPM).
- Set Swing to 13% and Speed to 20% (12 BPM).
At this point you may wish to experiment with the pan/tilt attributes and the effect controls with Pan/Tilt Combo off or on.
In ONYX you can have different attributes on the same fixture running different effects at different speeds. All attributes of every fixture can run an effect.
Set the FX Timing Parameters to Offset the FX
When you're building FX on multiple fixtures, it's not very exciting to have all of the fixtures run the FX at the same exact time. While that may be what you want occasionally, more often you want to offset your FX.
With no offset assigned to an FX, your selected fixtures will all be running the effect at the same time.
In the FX timing section, we can choose from "Wave" and "Step" as different means to offset our fixtures.
Wave and Step
Once we switch over to the FX Timing parameter group, we see the Wave and Step controls.
If you get to this step and see "Delay, Shift, Wait" on the encoders, press FX Timing again to get back to the first page where Wave and Step reside.
While in the Programmer, you'll see FX values for Delay, Shift and Wait, you can more easily work with these values as Wave and Step. When you select either a Wave value or a Step value, ONYX automatically calculates the Delay, Shift, and Wait values for each fixture, which vary depending on your selection.
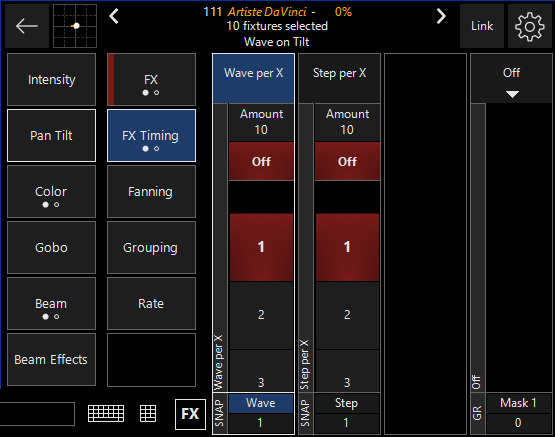
The “Amount X” (where X equals the number of fixtures selected) button is used in combination with the “Wave” and “Step” functions. This allows you to quickly set the Wave or Step elements to the total number of fixtures selected. This effectively "spreads" the effect evenly through the selected fixtures so that no two fixtures are performing the same step at the same time.
Wave
Wave offsets the Mode (Shape) of the FX across the number of fixtures selected in the "Wave per X" encoder. In the picture above I have 10 fixtures running an effect.
If I set the Wave to 10, I see the effect mode happen once across my fixtures.
If I set the Wave to 5, I see the effect mode happen twice across my fixtures.
Step
Step is similar to Wave, but a little bit different. When you choose a Step, ONYX will have each fixture complete the mode and then the effect moves on to the next fixture.
Again, in the picture above, if I set the Step to 10, the effect will happen on 1 fixture at a time, and then pass on to the next fixture.
If I set the Step to 5, the effect will happen on 2 fixtures at a time, and then move on to the next 2.
If I set the Step to 2, half of the fixtures will run the effect, and then the other half. Step can be used to make some intricate "marquee" style chasing effects!
Remember: Wave and Step are 2 different ways to control the same thing (FX Offset). Use only one, and be sure to set the other to "Off" to avoid confusion when programming!
Effect Grouping
The "GR" panel allows you to leverage group mask functions within your FX. With this you can create difficult patterns very quickly.
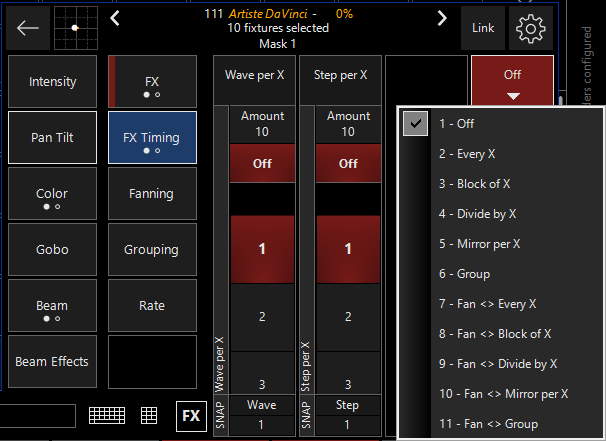
To enable FX grouping, click or press the tab with the down arrow at the top of the "GR" parameter display (in the above image. it reads "Mirror per X," but the title will change depending on the grouping selected).
A drop down menu will appear with the available grouping options listed. Select a grouping option by touching or clicking it.
If the grouping requires a mask amount, you can set that by touching in the panel or moving the trackbelt or encoder. For more information, see the chapter on " Using the Grouping Tools ."
Grouping Actions
You can also access the "actions" which are outlined in Using the Grouping Tools.
To use these, simply press the parameter group:
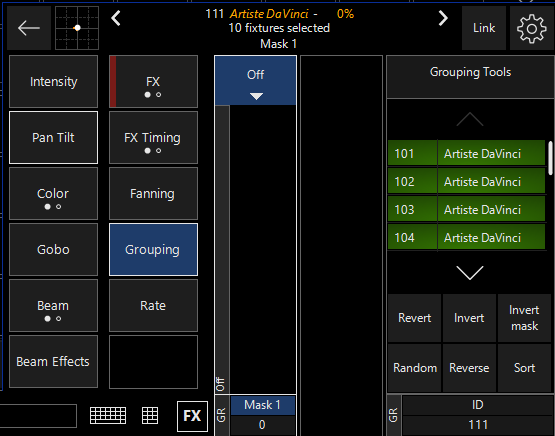
You now have access to great filters such as "Random", "Reverse" and "Sort", which can be very helpful when creating FX!
Examples of Effect Grouping
Mirror Intensity Sweep Example
- Select Group 4 (Dartz 360's)
- Select the Intensity parameter and set it to 0%
- Press the parameter group.
- Set Swing to 200% (2:1).
- Set Speed to 40% (50 BPM)
- Set the Mode to "FX 8"
- Under FX Timing, set the Grouping Tools to "Fan <> Mirror per 2" .
- Set the "Wave Per X" Counter to 12.
You'll now see an intensity effect, where the intensity moves from outside to in across the Dartz 360's.
Every Intensity Sweep Example
- Select Group 4 (Dartz 360's)
- Select the Intensity parameter and set it to 0%
- Press the parameter group.
- Set Swing to 200% (2:1)
- Set Speed to 40% (50 BPM)
- Set the Mode to Mode 7
- Under the parameter group, set the Grouping Tools to "Fan <> Every 4".
- Set the "Wave Per X" Counter to 6.
You'll now see a intensity "sweep" that resets every 4 fixtures.
Block Intensity Effect Example
- Select Group 4 (Dartz 360's)
- Select the Intensity parameter and set it to 0%
- Press the parameter group.
- Set Swing to 200% (2:1)
- Set Speed to 40% (50 BPM)
- Set the Mode to Mode 7
- Under FX Timing, set the Grouping Tools to "Fan <> Block of 2".
- Set the "Step Per X" Counter to 6.
You'll see how the effect works in "blocks" of 2 fixtures at a time, repeated 6 times across the 12 fixtures.
Divide Intensity Effect Example
- Select Group 4 (Dartz 360's)
- Select the Intensity parameter and set it to 0%
- Press the parameter group.
- Set Swing to 200% (2:1)
- Set the speed to 40% (50 BPM)
- Set the Mode to Mode 7
- Under the parameter group, Set the Grouping Tools to "Fan <> Divide by 4"
- Set the "Wave Per X" Counter to 6.
This FX will do a "build" across the 4 sets of fixtures that you divided.
Group Intensity Effect Example
- Select Group 1 (Artiste DaVinci), Group 2 (Fuze Wash Z350) and Group 3 (Dartz 360)
- Select the Intensity parameter and set it to 0%
- Press the parameter group.
- Set Swing to 200% (2:1)
- Set the Speed to 40% (50 BPM)
- Set the Mode to Mode 7
- Under the parameter group set the Grouping Tools to "Fan <> Group"
- Set the "Step Per X" Counter to 3.
In this case, each of the 3 groups now runs the effect, then the next begins it.
Pan/Tilt and “P/T Combo”
By default, Pan and Tilt FX always work together, so that it's easier for you to create across both pan and tilt at the same time. Because of this, when you go to build an effect with Pan and Tilt, the options look a little bit different.
You’ll see that the FX section now has four columns: Swing Pan, Swing Tilt, Speed, and Figure. The first 3 columns have been described above.
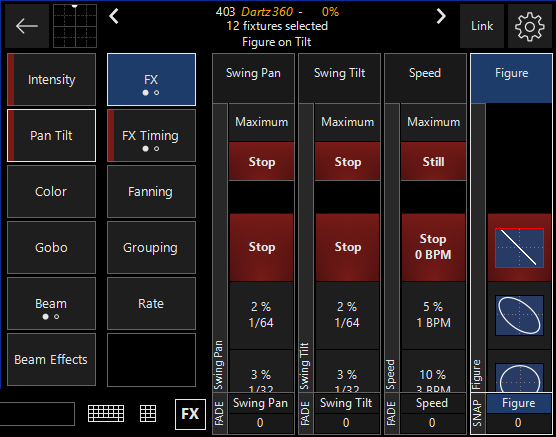
The new column, “Figure” contains a variety of geometric shapes that the fixtures can be programmed to approximate. Altering the swings and speed as well as the baseline will determine the actual movement of the fixture(s).
You can also see all of the "Figures" by double-clicking the parameter name.
You'll also notice that there is now a second "page" of FX parameters.
Click again, and you'll be taken to the 2nd page of FX parameters, which only shows for Pan/Tilt Combo FX:
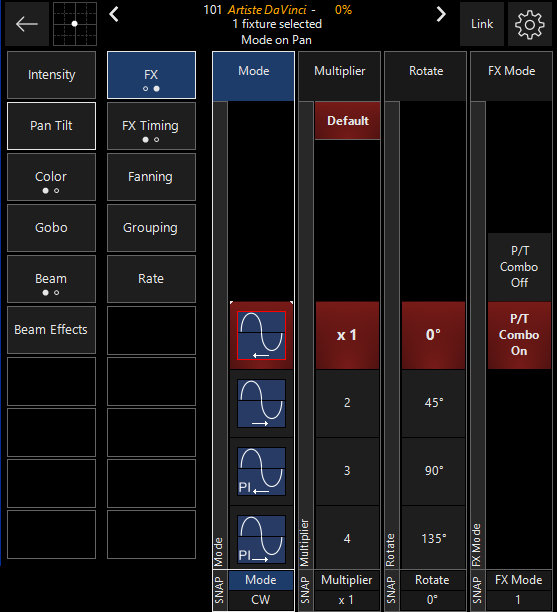
First, we see Mode. In Pan/Tilt Combo FX, mode allows you to quickly modify the direction of the whole effect, or parts of it.
On the mode selectors, we can see some have the letters PI and TI.
PI will invert the pan, and TI will invert the tilt. This is a very quick way to get a different shape.
The multiplier column works in the same way as regular FX (explained above).
Rotate allows you to adjust FX for fixtures that are hung in a different direction, or whatever creative idea you come up with!
Last, we have FX Mode, which allows us to turn on or off P/T combo entirely. When P/T combo is off, Pan and Tilt work independently with FX, just like any other parameter in ONYX.
While they have a few extra controls, for the most part Pan/Tilt FX work much like any other FX. For many FX, it may make sense to use the P/T combo, but it can always be disabled per effect as desired.
FX Inside of Cuelists
It is important to realize that while FX attributes do not pertain to an actual physical device (such as an iris or pan/tilt motor), ONYX treats it the same as any other attribute. This is particularly apparent and useful when discussing LTP.
Effect Values are the same as any other value, they track through the cuelist. The base value and effect value both track independently of the other.
That is to say, if you have a step effect running on Cyan, with a base value of 0% then you record another cue with Cyan at 100%, the effect will still be running in the second cue. This may be desirable, but in the case of you wanting to remove the effect, it will need to be "stomped".
Furthermore, each Effect channel will also track independently of the other effect channels and the associated base vale. This is to say that you could change the mode of an effect and the rest of the data will track through to the next cue.
Stomping, or removing, an effect is essentially just assigning its swing value to 0%. For example, make a Cyan effect on the Artiste DaVinci's and record this as Cue 1. Now for Cue 2, we want the Cyan base value to stay the same but we want to remove the effect.
- Select the Artiste DaVinci's.
- Set the swing value to 0%
- Record Cue 2.
Note that in Cue 1 the Cyan effect runs as expected, Cue 2 will stop the effect.
Note that there are FX Macros already generated which contain FX stop for various parameters. For more information on how to use the Macros, see FX Macros.
We can examine some more of this behavior with these examples.
FX “Speed" As its own Cuelist
- Select a moving light and bring it to full.
- Select the “Tilt” attribute.
- In FX, set the Swing to 50%. Do Not Change The Speed. Leave Speed at zero.
- Record this in a new Cuelist of type Cuelist.
- Without clearing the Programmer, set the Speed to 40%. Do Not Change The Swing.
- Record this in a new Cuelist of type “Override”.
- Execute both Cuelists and take both faders to full.
You can now see the moving light tilting up and down. When you pull down the Override cuelist fader, you have manual control over the speed of the effect. What’s more, the other fader will control the intensity of the fixture giving you full control of the look.
Had a speed been entered in the first cue created, the override cue would still have taken control of the fixture. Once the override cue had been released, the fixture would have returned to the original speed.
"Speed" in the same Cuelist
- Select any group of fixtures. Leave the intensity at 0.
- Select the intensity attribute.
- In FX, set Swing to 200%, Speed to 25% and select Mode FX 3.
The fixtures should be fading from zero to full. - Press the parameter group button and set a shift or delay value.
- Record as cue 1 in a new cuelist.
- Without clearing the Programmer, press and increase the Speed to 50%.
- Record as cue 2 in the same cuelist and clear the Programmer.
When we play these cues, we can see that the speed increases when cue 2 is executed. If we make changes in cue 1, we’ll see those changes track through and again, all cue 2 will do is increase the speed.
Reference: Delay, Shift and Wait
Delay, Shift, and Wait are the parameters that ONYX uses when you select Wave or Step when creating an effect.
Most users do not need to touch these parameters, and Wave and Step do everything they need.
But since this is the user manual, it's important to cover in case you need to modify them directly.
Delay
The Delay element creates the image of a wave of FX. With the same regular FX running on a group of fixtures, utilizing Delay will cause the fixtures to be at a different points in that FX. The number of points along the duration of the effect that the group of fixtures is divided into is set using Delay. While Delay can be set using the encoders, it is highly recommended that you use the touch screen; either the pop-up window or by touching the values listed in the Delay column.
Shift
Shift is similar to delay except where delay divides the effect and distributes the fixtures evenly along its curve, Shift divides the number of fixtures evenly and distributes the effect to them. The pop-up window for Shift is essentially identical to the wave pop-up with the exception that “step” is used instead of “wave.”
Wait
The Wait element, unlike some of the other elements found in the FX section, is not expressed as an arbitrary value, but is instead expressed in seconds from 1 to 1000. The wait is the amount of time between the completion of an FX, and when the FX restarts. If, for example, you’re using an FX that takes 10 seconds to go through all of its steps and you have a wait time of 5, all the fixtures will go through the FX once and will then sit at their baseline for 5 seconds before running the FX again.