Command Line Reference
The Command Line is a very powerful tool that can allow you to quickly perform a variety of functions. For your reference, these functions are listed in groups below:
Shortcuts
Below are some commonly used “shortcuts” or quick commands.
| Command | Description |
|---|---|
|
[.] [ENTER] |
Selects all fixtures in the Programmer |
|
[0] [ENTER] |
Deselects all fixtures in the Programmer |
|
[.] [0] [ENTER] |
Grabs every patched fixture in the entire show and puts it into the Programmer |
|
[CUE] [X] [ENTER] |
Goes to the specified cue in the specified time |
|
[SNAP + [CUE] [X] [ENTER] |
Goes to the specified cue in time zero |
|
[SNAP] + [REL] |
Fades all fixtures to zero and then releases them from all playback controls in the specified time |
|
[REL] + [SNAP] |
Releases all attributes of all fixtures in all playback controls simultaneously |
|
[EDIT] [ENTER] |
Loads all attributes of the active cue in the selected cuelist into the Programmer for editing |
|
[RECORD] [ENTER] |
Records the contents of the Programmer into the next available whole numbered cue in the selected cuelist. |
|
[LOAD] [LOAD] [LOAD] [ENTER] |
Loads the current output of all playbacks into the Programmer |
Command Line Status
The Command Line shows the current status of the operation.
Blind

All operations are sent to the programmer but the programmer is not sent to the DMX output. Live/Blind can be toggled with PREVIEW.
Highlight

Selected fixtures assume the Highlight state which usually is Open White with Intensity at 100%. Highlight can be customized from the Highlight tab in the Default window.
Patch

ONYX is in the patch mode and all operations are sent to the patch spreadsheet displayed above the Command Line.
Offline / Free

With no device connected, ONYX can still be used to output up to 4 universes. For more, see ONYX Licensing.
Live

The indicator beside the command line will read "Live" when ONYX USB hardware is connected. For more, see ONYX Licensing.
Note: Grey text in the Command Line indicates that this was the previous command and the Command Line is now clear.
Fixture Selection
All fixture selection can also be done visually from the Fixture and Group windows, or via the command line and number keypad.
Learn more about Selecting Fixtures and Groups here.
This section is going to outline how to select fixtures with the command line and key pad.
| Command | Description |
|---|---|
|
1 ENTER |
Selects fixture 1 |
|
1 + 10 ENTER |
Selects fixture 1 + 10 |
|
1 THRU 10 ENTER |
Selects fixture 1 through 10 |
|
1 THRU 10 - 8 ENTER |
Selects fixture 1 through 10 minus fixture 8 (1-7, 9-10) |
|
3 + 10 + 1 ENTER |
Selects fixture 3 and 10 and 1 (and stores the order of selection) |
|
+ 15 ENTER |
Adds fixture 15 to current selection |
|
- 7 ENTER |
Deselect fixture 7 from the current selection |
|
GROUP 8 ENTER |
Selects Group 8 |
|
- GROUP 5 ENTER |
Deselects Group 5 |
|
NEXT |
Advance forward through selected fixtures or select next set of fixture mask |
|
PREVIOUS |
Step backwards through selected fixtures or select previous set of fixture mask |
|
NEXT + PREVIOUS |
Reactivate fixture selection, used when a grouping tool/mask is in place or when next/last has been used within a selection. |
| Selection Shortcuts | |
|
. ENTER |
Selects all fixtures currently in the programmer |
|
0 ENTER |
Deselects all fixtures currently in the programmer |
|
. 0 ENTER |
Selects all fixtures patched into the current showfile |
|
/ ENTER |
Inverts fixture selection in the programmer |
Grouping
ONYX can combine fixtures and groups in patterns to create useful fixture selections.
It also allows to use the patterns as masks for powerful offsets and value spreads with the Fanning and Effects tools.
The function is accessed from the Parameter Group Button "Grouping" in the right side (or second page) of the Parameter Control buttons.
Learn more about using the Grouping Tools here.
| Command | Description |
|---|---|
|
|
Reactivate fixture selection |
|
|
Invert fixture selection in the programmer |
|
|
Invert selection within selected fixture mask |
|
|
Randomizes selection order to use with Fanned timings and Effect delay (Step or Wave per x) |
|
|
Sorts the current selection by the reversed ID #'s |
|
|
Sorts current selection order by their ID #'s |
|
|
Turn off grouping. |
|
|
Current fixture selection is divided into every "X" fixtures, where X is the number you select. Use NEXT to advance through masked selection |
|
|
Current fixture selection is divided into blocks of "X" fixtures. |
|
|
Current fixture selection is divided into "X" equal parts. |
|
|
Current fixtures are selecting in a mirror, with "X" being the total number of fixtures selected at one time. |
|
|
NEXT/PREVIOUS advances in Groups. Groups can be used as Fan and Effect Offset Points. |
| (Grouping Tools Command) |
Values are applied to all fixtures in selection all calculated value spreads (Fanning and Effect Offsets) use the Grouping Tools. |
Conditional Fixture Selection
This feature allows to select fixtures based on their current state in the playback on stage, for example all RED fixtures that are pointing to the DRUMS preset, or all fixtures that are currently 100% Intensity.
The command can be executed with an empty programmer to query the entire patch.
If fixtures are already selected in the programmer, the query is only considering those fixtures. This allows to select a Group first, e.g. all Washlights, then to select all BLUE fixtures.
The command can be executed as a selection tool with GROUP or as capture tool using LOAD.
| Command | Description |
|---|---|
| , then touch | Selects all fixtures that currently use the preset in the output |
| Selects all fixtures that currently use all of the selected presets in the output | |
| (hold) | Also selects all fixtures that currently use all of the selected presets in the output. |
| Group FULL | Selects all fixtures at 100% Intensity in the output |
| Group Enter | Selects all fixtures above 0% in the output |
| Group @ 20 Enter | Selects all fixtures with exactly 20% Intensity |
| Group @ 50+ Enter | Selects all fixtures with 50% and higher Intensity |
| Group @ 30- Enter | Selects all fixtures with 30% and less Intensity |
| Group @ 20 THRU 80 Enter | Selects all fixtures with from (and including) 20% to 80% Intensity |
| Read output for all fixtures that currently use the preset in the output | |
| (hold) | Loads output for all fixtures that currently use all of the selected presets in the output |
| Load Group FULL | Read output for all fixtures at 100% Intensity in the output |
| Load Group @ 20 Enter | Read output for all fixtures with exactly 20% Intensity |
| Load Group @ 50+ Enter | Read output for all fixtures with 50% and higher Intensity |
| Load Group @ 30- Enter | Read output for all fixtures with 30% and less Intensity |
| Load Group @ 20 THRU 80 Enter | Read output for all fixtures with from (and including) 20% to 80% Intensity |
Intensity Commands
Intensity commands are used to assign dimmer levels to the fixture without needing to access the parameter controls.
They also allow to add or subtract values and they can be used to spread / fan levels across the fixture selection for more dynamic looks.
This is especially interesting in combination with the Grouping feature.
| Command | Description |
|---|---|
| [SELECTION] FULL | Set Intensity for [SELECTION] to 100 % (e.g. 10 FULL) and confirm fixture selection |
| [SELECTION] @ 25 ENTER | Set Intensity for [SELECTION] to 25 % (e.g. 15 @ 25 Enter) |
| [SELECTION] @ + 15 ENTER | Add 15 % Intensity to [SELECTION]] (e.g. Group 5 @ + 15 Enter) |
| [SELECTION] @ - 25 ENTER | Subtract 25% Intensity from [SELECTION] (e.g. 15 @ - 25 Enter) |
| [SELECTION] @ 0 THRU 100 ENTER | Spread the Intensity across the [SELECTION] from 0 to 100% (e.g. @ 0 > 100 Enter) |
| [SELECTION] @ 0 THRU 100 THRU 0 ENTER | Spread the Intensity across the [SELECTION] from 0% to 100% to 0% (e.g. @ 0 > 100 > 0 Enter) |
Parameter Commands
Values can be entered directly for specific parameters, e.g. Magenta at 50%. It also possible to fan values across a selection with THRU.
Presets can be selected directly from the Command Line with the @ key and the Parameter Buttons.
| Command | Description |
|---|---|
| [Selection] @ Parameter Group # Enter | Selects Preset # in Parameter Group specified, e.g. @ Color 10 Enter |
| [Selection] @ Parameter Button # Enter | Assigns Value to Parameter, (Percent or DMX depends on Programmer setting) e.g. @ Magenta 50 Enter |
| [SELECTION] @ Parameter Button 0 THRU 100 ENTER | Spread the Value across the [SELECTION] from 0 to 100% (e.g. @ Cyan 0 > 100 Enter) |
| [SELECTION] @ Parameter Button 0 THRU 100 THRU 0 ENTER | Spread the Value across the [SELECTION] from 0% to 100% to 0% (e.g. @ Iris 0 > 100 > 0 Enter) |
Playback Select
The selected cuelist is used for all modifications, options and CUE commands. Throughout the various ONYX hardware, there are different buttons that default to the select button.
This is customizable through the Function Assignments.
| Command | Description |
|---|---|
| Main Playback Fader/Playback Module | Default is the topmost button, but can be customized. Also can be selected using the touch screen. |
| Button Module | Default is LCD button, but can be customized. |
| Submaster Module / M-Play | When empty the flash button acts as SELECT. You can also hold and press the flash button on an occupied submaster. |
| Playback Buttons | The screen button acts based on the chosen Mode above (Go, Pause, Select). Empty buttons are always SELECT |
| Cuelist Buttons | The cuelist directory buttons always act as SELECT |
Record
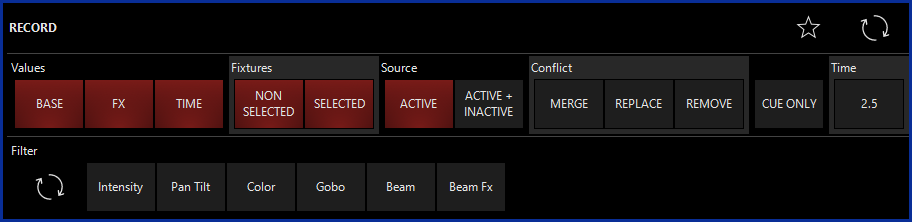
Record is used to create new items in the showfile or to overwrite an existing one. A popup will ask for confirmation and overwriting choices depending on the item.
A toolbar is used to further define filters and options for RECORD. Read more about the Record Options here.
| Command | Description |
|---|---|
| RECORD [PLAYBACK SELECT] | Add new cue to end of specific playback If playback is empty asks for cuelist type to create |
| RECORD CUE # ENTER | Record Cue to specific Cue # in current selected cuelist |
| RECORD CUE # THRU # ENTER (e.g. RECORD CUE 2 THRU 10 ENTER) | If cues exist in range only merging in existing cues is possible If cue range is not existing, all cues within the range are created |
| RECORD CUE # + # + # THRU # ENTER | If cues exist conflict popups appear per cue |
| RECORD CUE # [PLAYBACK SELECT] | Record Cue to playback at the entered number. |
| RECORD GROUP # ENTER | Create new fixture Group and store fixture order and fixture filter settings. If Group exists, pop up asks to MERGE or REPLACE |
| Create new fixture Group and store fixture order and fixture filter settings. If Group exists, pop up asks to MERGE or REPLACE | |
|
Create new preset If existing preset is touched, pop up asks to MERGE or REPLACE. Default filter only records only values of selected preset paramter group, or filtered parameters as set in Record toolbar |
|
| (Hold) | Record new screenview |
Edit
Editing is used to change an existing item of the showfile.
| Command | Description |
|---|---|
| Edit the preset in the programmer, confirm changes of the changes with UPDATE | |
| EDIT ENTER | Edit the current active cue of the currently selected cuelist into the programmer for editing, confirm with |
| EDIT CUE # ENTER | Edit the cue # of the currently selected cuelist into the programmer for editing, confirm with |
| Edit the group in the programmer, confirm with |
|
| EDIT GROUP 4 ENTER | Edit group 4 in the programmer, confirm with |
| EDIT BANK ENTER | Renaming of current Bank |
| (Hold) | Bring up popout to "Unlock and Edit" |
| (Hold) | Edit shortcut functions for Function keys |
Update
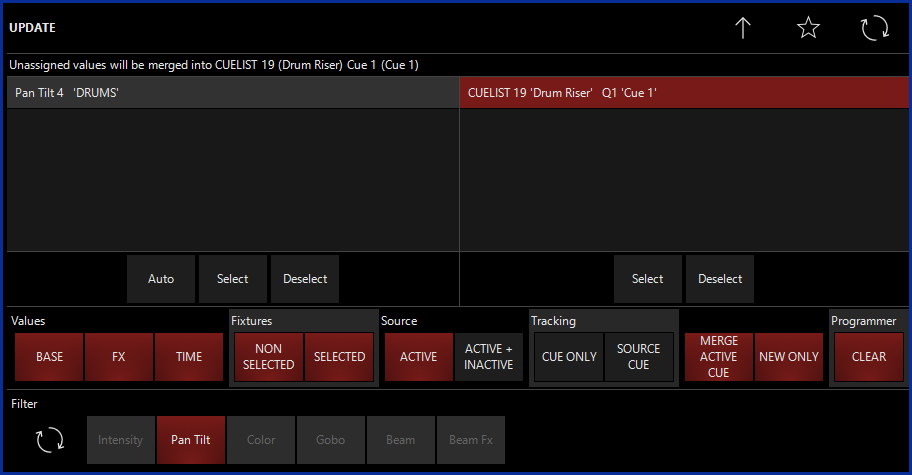
Update is either used to confirm a open EDIT command or it is used to trace current programmer values into the playback and offer direct updating of many playbacks and presets at once.
This is called "auto-update' and will open a popup to select options and include/exclude presets and cuelists.
| Command | Description |
|---|---|
| (confirm popups) | Uses current programmer values to trace current cues and presets using them toolbar allows to select / deselect which cues and presets to update. Second UPDATE press confirms command. |
Copy
is used to duplicate an item, such as a Group, Preset, Media Content, or Cue.
Copy Cue also shows some additional filter options in a toolbar.
| Command | Description |
|---|---|
| Create copy of existing preset | |
| Create copy of existing group | |
| COPY GROUP 5 @ 10 ENTER | Create copy of existing group |
| COPY PLAYBACK SELECT > PLAYBACK SELECT | Create a copy of the playback on new destination. Destinations are Submaster Faders, Playback Buttons, Playback Faders, Virtual Playback Buttons This does NOT create a new cuelist |
| Assigns the cuelist to a playback. | |
| Create copy of the cuelist. This DOES create a new cuelist | |
| COPY CUE 5 @ 15 ENTER | Copy cue 5 to 15 on currently selected cuelist |
| COPY CUE 5 @ 15 PLAYBACK SELECT | Copy cue 5 from current selected cuelist to cue 15 on specific playback cuelist |
| Copy cue 5 from current selected cuelist to a new cue at the end of specified playback |
Move
Move is used to rearrange items, such as a Group, Preset, Media Content, or Cue.
| Command | Description |
|---|---|
| > | Move Group button to a new # |
| MOVE GROUP 5 @ 10 ENTER | Move Group 5 to Group 10 |
| > | Move Preset button Preset can be moved between different preset pages, e g Move a Color preset to the P/T Preset page |
| MOVE PLAYBACK SELECT > PLAYBACK SELECT | Move cuelist to a different playback |
| > | Move cuelist to new #. Macros referencing this cuelist will be updated automatically |
| > | Assign the cuelist to a playback |
| MOVE CUE 5 @ 15 ENTER | Move cue 5 to 15 on currently selected cuelist |
| MOVE CUE 5 THRU 8 @ 15 ENTER | Move cue 5 through 8 to cue 15 on current selected cuelist |
Delete
Delete is used to remove items from the show, such as a Group, Preset, Media Content, or Cue.
| Command | Description |
|---|---|
| Delete a preset | |
| (hold) (release) | Delete a preset |
| Delete a group | |
| (hold) (release) | Delete a Group |
| DELETE GROUP 12 ENTER | Deletes Group 12 |
| DELETE PLAYBACK SELECT ENTER | Removes the Cuelist from the Playback |
| (hold) (release) | Removes the Cuelist from the Playback |
| Delete a Cuelist | |
| (hold) (release) | Delete a Cuelist |
| DELETE CUE 8 ENTER | Delete Cue 8 |
| DELETE CUE 8 THRU 12 ENTER | Delete Cue 8 through 12 |
| DELETE CUE 8 THRU 12 + 21 ENTER | Deletes Cue 8 through 12 and Cue 21 |
Clear
Clear is used to remove values from the programmer. It also is a shortcut for unpatching which is described in the PATCH section.
A toolbar allows filtering and multiple option in executing the CLEAR function.
![]()
| Command | Description |
|---|---|
| CLEAR ENTER | Removes all values from current selected fixtures in programmer |
| CLEAR SELECTION ENTER |
Removes all values from fixtures in SELECTION e.g. , , |
| CLEAR CLEAR |
All values and all fixture selection is removed from the programmer |
| (hold) CLEAR Parameter Group Button | Removes the values out of the programmer (e.g. Color) |
| (hold) CLEAR Parameter Button | Removes the value out of the programmer. Note that on some consoles, the parameter button is equal to pushing down the encoder wheel. |
| (hold) | Removes all values from specific fixtures or groups |
| Removes all values for the specific fixture | |
| Removes all values for the specific Group |
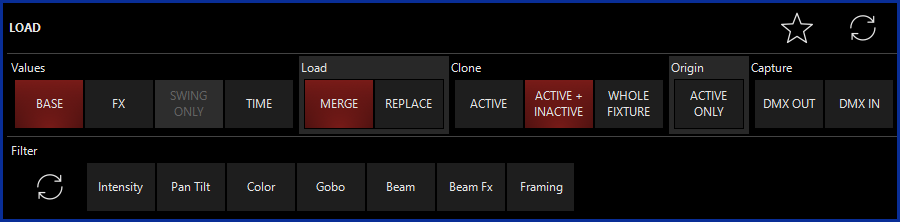
Load
Load has two main functions. Capturing a parameters current value from the output, and cloning / copying values across fixtures in the programmer.
| Command | Description |
|---|---|
| LOAD LOAD | Read current output for all selected fixtures |
| LOAD SELECTION ENTER |
Read current output for fixture in [SELECTION] e.g. Load 5 thru 10 Enter or Load Group 3 Enter |
| (hold) |
Read current output for specific fixture |
| (hold) | Read current output for specific Group |
| (hold) LOAD Paramete Group button | Read current output for all parameters in selected button (e.g. capture all color parameters) |
| (hold) LOAD Parameter button | Read current output for all parameters in selected button (e.g. LOAD Magenta) |
| (hold) | Read current output for specific Groups or Fixtures |
| Destination SELECTION @ Source SELECTION ENTER |
Copy values (clone) to the destination selection from the source selection Examples: Load 1 @ 5 ENTER Load Group 5 @1 ENTER Load 3 Thru 9 @ 1 Thru 3 ENTER Load 1 THRU 5 @ 15 THRU 10 ENTER |
| LOAD @ Source SELECTION ENTER |
Copy values (clone) to the current selection from the source selection (uses selection/ command order) Example: Load @ 5 Enter |
| LOAD SELECTION @ CUE # ENTER |
Extract the values for the selection out of the specific cue Example: Load 1 @ Cue 10 Enter |
| LOAD @ CUE # ENTER | Extract values for the current selection out of the specific cue |
| LOAD ENTER (no selection in programmer) | Load all active playback values into the programmer and select all current active fixtures |
Cue
Cue is used to target a CUE directly for execution on the selected cuelist and will read GOTO CUE on the Command Line.
Some commands may also require CUE like COPY, MOVE, DELETE and LOAD.
| Command | Description |
|---|---|
| CUE # ENTER | Goto Cue in selected cuelist |
| CUE # PLAYBACK SELECT |
Goto Cue in specific Playback button cuelist |
| CUE # |
Goto Cue in specific Virtual cuelist |
| (hold) before confirming the command to jump to the cue with no timing | |
Parameter Timings (Fade & Delay)
Fade and Delay timings are used to set specific timings for parameters. Fanned timings are a very powerful tool for dynamic looks, especially when used with the GROUPING tool.
All commands shown can be executed with DELAY instead of FADE
| Command | Description |
|---|---|
| Fade & Delay | |
| FADE Parameter button # ENTER |
Assign fadetime to the specified parameter group (e.g. Color) of current selection |
| FADE Parameter button # ENTER |
Assign fadetime to specific channel (e g Magenta) of current selection |
| FADE # ENTER | Assign fadetime to all parameters of the current selection |
| Command | Description |
|---|---|
| Remove timings from programmer with [-] | |
| FADE Parameter button - ENTER |
Removes all fade times and reverts them back to use base cue fade time |
| FADE Parameter button - ENTER |
Removes all fade times and reverts them back to use base cue fade time |
| FADE - ENTER | Removes all fade times and reverts them back to use base cue fade time |
| Command | Description |
|---|---|
| Split times for Intensities can be entered with [/] | |
| FADE Intensity 2 / 4 ENTER |
4s fade time for incoming intensities, 2s for outgoing intensities |
| FADE Intensity 8 / ENTER |
8s fade time in, out time is untouched |
| FADE Intensity / 1 ENTER | 1s fade time out, in time is untouched |
| FADE Intensity 5 / - ENTER | 5s fade time in, out time gets removed |
| Command | Description |
|---|---|
| Fanned (spread) timing can be created with THRU | |
| or Parameter button @ 0 THRU 10 ENTER |
Spread the delay time evenly from 0 to 10s across the selected fixtures (in order of selection) |
| … @ 0 THRU 5 THRU 0 |
Spread the delay time from 0s to 5s in the center to 0s at the end of the selection |
| … @ 2 THRU 0 THRU 2 | Spreads 2s on the edge to 0s in the center |
| Multiple commands are possible; split times can be fanned separately for in/out | |
| All combinations with fanning and split times are possible | |
| Intensity 2 THRU 8 / 4 ENTER | Incoming fades are spread from 2s to 8s, outgoing fades are a simple 4s |
| Command | Description |
|---|---|
| Parameter time offset | |
| or Parameter Button + 5 ENTER |
Adds 5s to every parameter fade time |
| or Parameter Button - 5 ENTER |
Subtracts 5s from every parameter fade time |
| or Parameter Button + 0 THRU 4 ENTER | Adds a fanned range of 0 > 4 s to every parameter time |
This syntax can be used with individual parameters, or you can press the Parameter Group Button to include the whole parameter group in your fade or delay timing.
Bank
Banks can be accessed directly on the consoles Playback Section
| Command | Description |
|---|---|
| BANK # ENTER |
Goto Bank # |
Cuelist Options
The Cuelist Options window is designed as an Editor. By default the surface is protected.
To enable any changes the cuelist window has to be switched to . This mode is active as long as the button is red.
| Command | Description |
|---|---|
| Touch name cell, type name, | Change cue name; changing multiple cells at once enumerates the name, e.g Gobo 1, Gobo 2, Gobo 3…. |
| Touch Trigger cell, select Trigger Mode, # | Change Cue Trigger to Go / Follow / Wait and assign x seconds for Follow or Wait |
| Touch Trigger cell, select Trigger Mode, | Toggle trigger mode without changing the time |
| Touch Trigger cell, 3 Enter | Change trigger time to 3s without changing trigger mode |
| Touch Fade, 4 ENTER | Change cue Base Fade time to 4s |
| Touch Fade, 4/2 ENTER | Assign split base fade time 4s in, 2s out to cue |
| Touch Fade, 5 / Enter | Change in time to 5s, leave out time |
| Touch Fade, / 8 Enter | Leave in time, change out time to 8s |
| Touch Delay, 2 / 6 ENTER | Assign split base delay time of 2s in, 6s out to cue |
| Touch Delay, 2 ENTER | Change cue Base Delay time to 2s |
| Touch Delay, 5 / Enter | Change delay in time to 5s, leave out time |
| Touch Fade Mode, change to Fade All, Snap All, Default | Changes the cue to make all parameters SNAP or FADE |
| Touch Fade (Delay) Override , 3 Enter | Changes all parameter delay times to 3s |
| Touch Fade (Delay) Override , 1 THRU 3 Enter | Changes lowest and highest parameter times in cue (and adjust all times in between relatively) |
| Touch Fade (Delay) Override, - Enter | Removes all parameter times out of the cue (all parameter will use the cue base time again) |
| Touch Fade (Delay) Override, + 2 Enter | Adds 2s to every parameter time in the cue |
| Touch Fade (Delay) Override, - 3 Enter | Subtracts 3s from every parameter time in the cue |
| Touch Comment |
Change the cue comment (text only) |
Extra features for TimeCode Cuelists:
| Command | Description |
|---|---|
| Timecode Cuelist Mode Only | |
| Touch TimeCode cell, enter new TimeCode | Changes timecode time |
| Touch TimeCode cell, + 15 Enter | Adds 15 frames to existing timecode |
| Touch range of TimeCode cells, - 5 Enter | Subtract 5 frames from range of cues |
| Touch TimeCode cell, - - Enter | Erases timecode and reverts to manual trigger |
| Touch | Change cue macro |
| ; touch | Select destination cue to jump to |
| ; touch | Specify amount of links to be executed |
Cuelist Renumber
Cue numbers can only be changed when the mode is active (red).
| Command | Description |
|---|---|
| Touch Cue 3 cell, 15 Enter | Renumbers cue 3 to cue 15 |
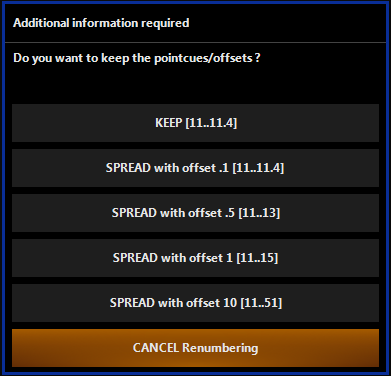
| Select range of Cue # cells, 10 Enter | Assigns range of cues to new start at cue # 10, Pop-Up will offer different spreads: |
| by .1 (10.1, 10.2, 10.3….) | |
| by 5 (10, 10.5, 11, 11.5...) | |
| by 1 (10, 11, 12…) | |
| by 10 (10, 20, 30, 40…) | |
| leave untouched (leaves spacing intact, e.g. 1 1.5 2 renumbered to 10 creates 10 10.5 and 11 ) |
Patch (Command Line)
ONYX provides a patch Command Line that allows many different combinations.
In addition to the Command Line, adding of fixtures and assigning addresses also offers a Auto Patch mode.
Patching is active as long as the Command Line indicates "PATCH".
| Command | Description |
|---|---|
| Choose TYPE | Fixture type from existing fixtures in show or new types out of fixture library |
| (AutoID) (AutoAddress) (AutoDMXUniverse) | Console suggested values for automatic fixture IDs and addressing |
| UNIVERSE # ENTER | Select Universe # for patching and viewing |
| Universe " < " or " > " | Scrolls through available Universes with the <> touchscreen buttons |
| RECORD 20 (AutoID) | Adds 20 fixtures of TYPE to the patch at next available fixture ID |
| RECORD 20 101 ENTER | Adds 20 fixtures of TYPE to the patch starting at ID 101 |
| RECORD 20 (AutoID) @ 201 ENTER | Adds 20 fixtures of TYPE starting at the next available ID and patches it to address 201 |
| RECORD 20 101 @ 201 ENTER | Adds 20 fixtures of TYPE starting at ID 101 and patches it to address 201 |
| (AutoID) ENTER | Adds one fixture of TYPE to the patch |
| 101 ENTER | Adds one fixture of TYPE to the patch at ID 101 |
| 101 + 105 + 108 ENTER | Adds fixtures 101, 105, 108 of TYPE |
| 101 THRU 110 ENTER | Adds fixtures 101 > 110 of TYPE |
| 101 @ 201 ENTER | Add fixture 101 of TYPE and patch it to address 201 |
| 101 + 105 + 108 @ 201 ENTER | Add fixture 101, 105, 108 of TYPE and patch it to address 201 |
| 101 THRU 110 @ 201 ENTER | Add fixture 101 > 110 of TYPE and patch it to address 201 |
| 115 @ 401 ENTER | Patch fixture ID 115 to address 401 |
| 115 @ / 5 ENTER | Patch fixture ID 115 to the next available address on universe 5 |
| 115 THRU 121 @ 5 ENTER | Patch fixture ID 115 > 121 to address 5 |
| 115 @ (AutoAddress) | Patch fixture 115 at next available DMX address |
| 115 + 120 THRU 125 @ 201 ENTER | Patch fixture 115 and 120 > 125 @ address 201 |
| 51 THRU 31 @ 354 ENTER | Patches 51 > 31 to address 354 using the inverted fixture order |
| 101 @ 1 + 15 + 91 ENTER | Patch fixture 101 at address 1, 15, 91 |
| 101 @ 5 THRU 25 | Patch fixture 101 at address 5 > 25 |
| 1.1 @ 105 | Patches fixture part 1 of ID 1 to address 105 |
| 1.1 THRU 10 1 @ 105 | Patches fixture part 1 of ID 1 > 10 to address 105 |
| (patching @ address can also be done by touching the address cells) | |
| CLEAR 101 ENTER | Clear (unpatch) the DMX address of fixture 101 |
| CLEAR 101 + 105 ENTER | Unpatch fixture 101 and 105 |
| CLEAR 1 + 5 THRU 10 ENTER | Unpatch fixture 1 and 5 > 10 |
| CLEAR 101 @ 15 ENTER | Unpatch address 15 from fixture 101 |
| CLEAR @ 91 ENTER | Unpatch address 91 from a fixture in current Universe |
| CLEAR /5 ENTER | Unpatch all fixtures in universe 5 |
| DELETE 101 ENTER | Delete fixture 101 from the showfile |
| DELETE 101 + 105 ENTER | Delete fixture 101, 105 from the showfile |
| DELETE 101 + 105 THRU 110 ENTER | Delete fixture 101, 105 > 110 from the showfile |
| MOVE 1 @ 5 ENTER | Renumber fixture ID 1 to ID 5 (if 5 is available) |
| MOVE 1 THRU 10 @ 51 ENTER | Renumber fixture 1 > 10 to ID 51 |
| (renumbering IDs can also be done by touching the ID cells) | |
| Touch NAME cell (Name) | Renames the fixture to (Name) |
Patch (Cloning Fixtures)
Sometimes it is necessary to add fixtures to a show after programming is completed. ONYX allows you to clone and duplicate fixtures in the patch easily using natural language. This results in the new fixtures being added into all cues, presets and groups.
Cloning allows also to duplicate programming to a different fixture type. It will try to emulate the original fixture as close as possible during the command.
Cloning is easy to do via the graphical interface. Learn how to use Cloning here.
You also can clone via the command line:
Command Line examples
| Command | Description |
|---|---|
| COPY 1 @ 301 | Copies all cue values, preset values and group memberships from fixture 1 to fixture 301 |
| COPY 1 @ 301 + 305 | Copies all cue values, preset values and group memberships from fixture 1 to fixture 301 and 305 |
| COPY 1 THRU 10 @ 310 THRU 301 | Copies all cue values, preset values and group memberships from fixture 1 > 10 to fixture 310 > 301 |
| COPY 1 + 8 @ 301 + 305 | Copies all cue values, preset values and group memberships from fixture 1 to 301 and fixture 8 to 305 |